
Getting started with Vantic
Everything Vantic can do, in the order you'll want it. Each section shows where a feature lives, what it does and a few ways to get more out of it. Read it top to bottom, or jump straight to what you need.
Last updated
Step 1
Welcome to Vantic
Vantic brings YouTube, Instagram, TikTok, Facebook and X into one place: one dashboard for all your numbers, a daily email report, insights and alerts that tell you what changed, and tools to post one video everywhere (now or on a schedule), share a media kit and design thumbnails.
Where: Sign up on the website, then everything lives in the app.
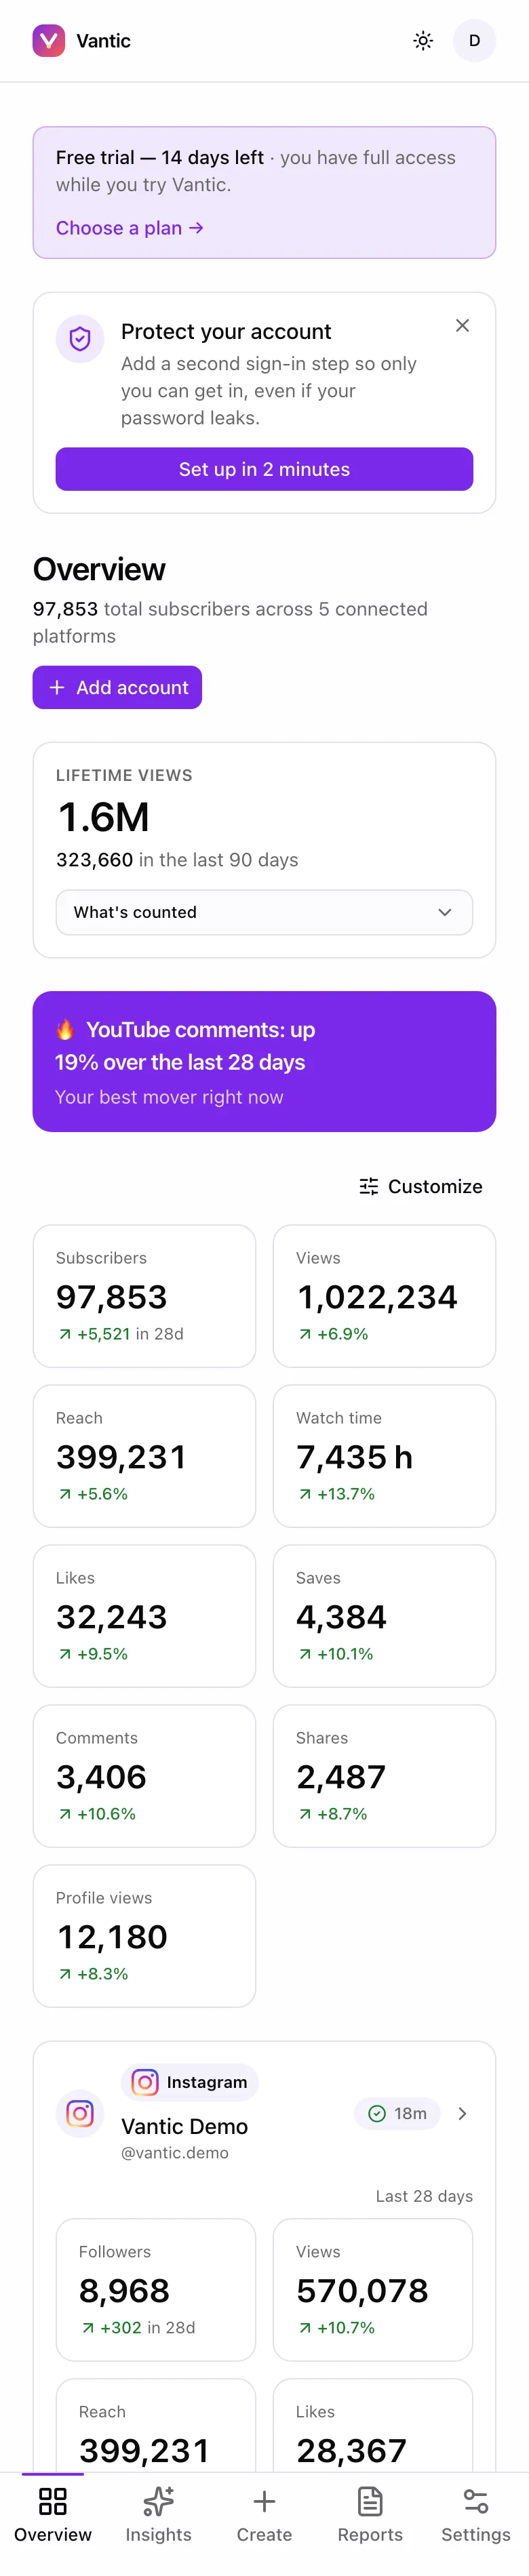
- 1. Your total across every connected platform
- 2. Your best mover: the metric that moved most in 28 days
- 3. Customize: reorder or hide metrics
- 4. Each metric with its 28-day change
- 5. One card per account — tap for the full picture
- 6. Add another account any time
Steps
Connect, then check in once a day
Link the platforms you post on and your history pulls in by itself. After that, a look at the Overview or the morning email is all it takes.
Get the most out of it
- Vantic works fine with one platform and gets more useful with each one you add.
- Install it on your phone first (next section) — that's where most people check their numbers.
Questions
What does Vantic do?
Vantic connects to your YouTube, Instagram, TikTok, Facebook and X accounts and shows all your numbers on one dashboard. It emails you a daily report, writes up what changed with insights and alerts, and lets you publish one video to every platform, now or at a time you choose, share a media kit with brands and design thumbnails.
Is there a free trial?
Yes. Every new account gets a 14-day free trial with every feature included.
Step 2
Install it on your phone
Vantic installs to your home screen straight from your browser — no app store needed. It then opens full-screen like any other app and can send you push alerts.
Where: Your phone's browser, while you're signed in.
Steps
On iPhone (Safari)
Open Vantic in Safari, tap the Share button (the square with an arrow pointing up), scroll down and tap "Add to Home Screen", then tap Add.
On Android (Chrome)
Open Vantic in Chrome, tap the menu (three dots, top right), then tap "Install app" or "Add to Home screen".
Get the most out of it
- From then on, open it from the new icon. The tab bar along the bottom is Overview · Insights · Create · Reports · Settings.
- Push alerts only work in the installed app on iPhone, so install it before you switch them on.
- Seeing an old version after an update? Close the app fully (swipe it away) and open it again.
Questions
Is there a Vantic app in the App Store or Google Play?
You don't need one. Vantic installs straight from your phone's browser: on iPhone use Safari's Share button and "Add to Home Screen"; on Android use Chrome's menu and "Install app". It then opens like any other app.
Step 3
Connect your first account
Connecting is how your numbers get in. You sign in on the platform's own page and approve access — we never see your password — and your history starts pulling in straight away.
Where: Settings → Connections (a brand-new account also shows Connect buttons on the Overview).
Swipe sideways for all 3 screens.
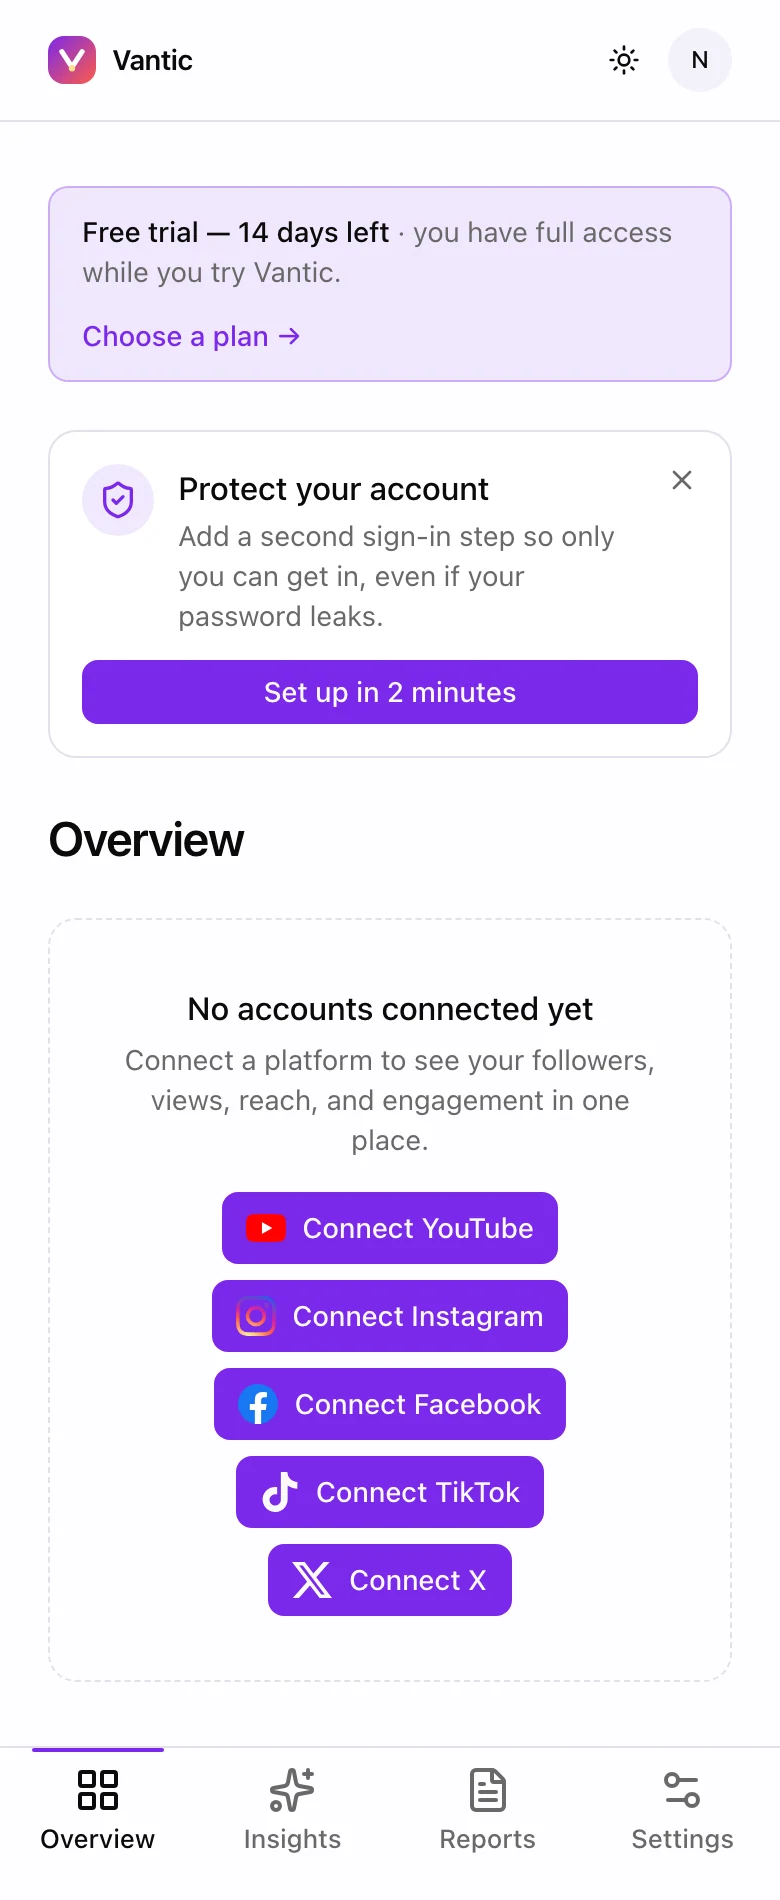
- 1. Your Overview before anything is connected
- 2. Connect your first account from here
- 3. The tab bar: Overview, Insights, Reports, Settings
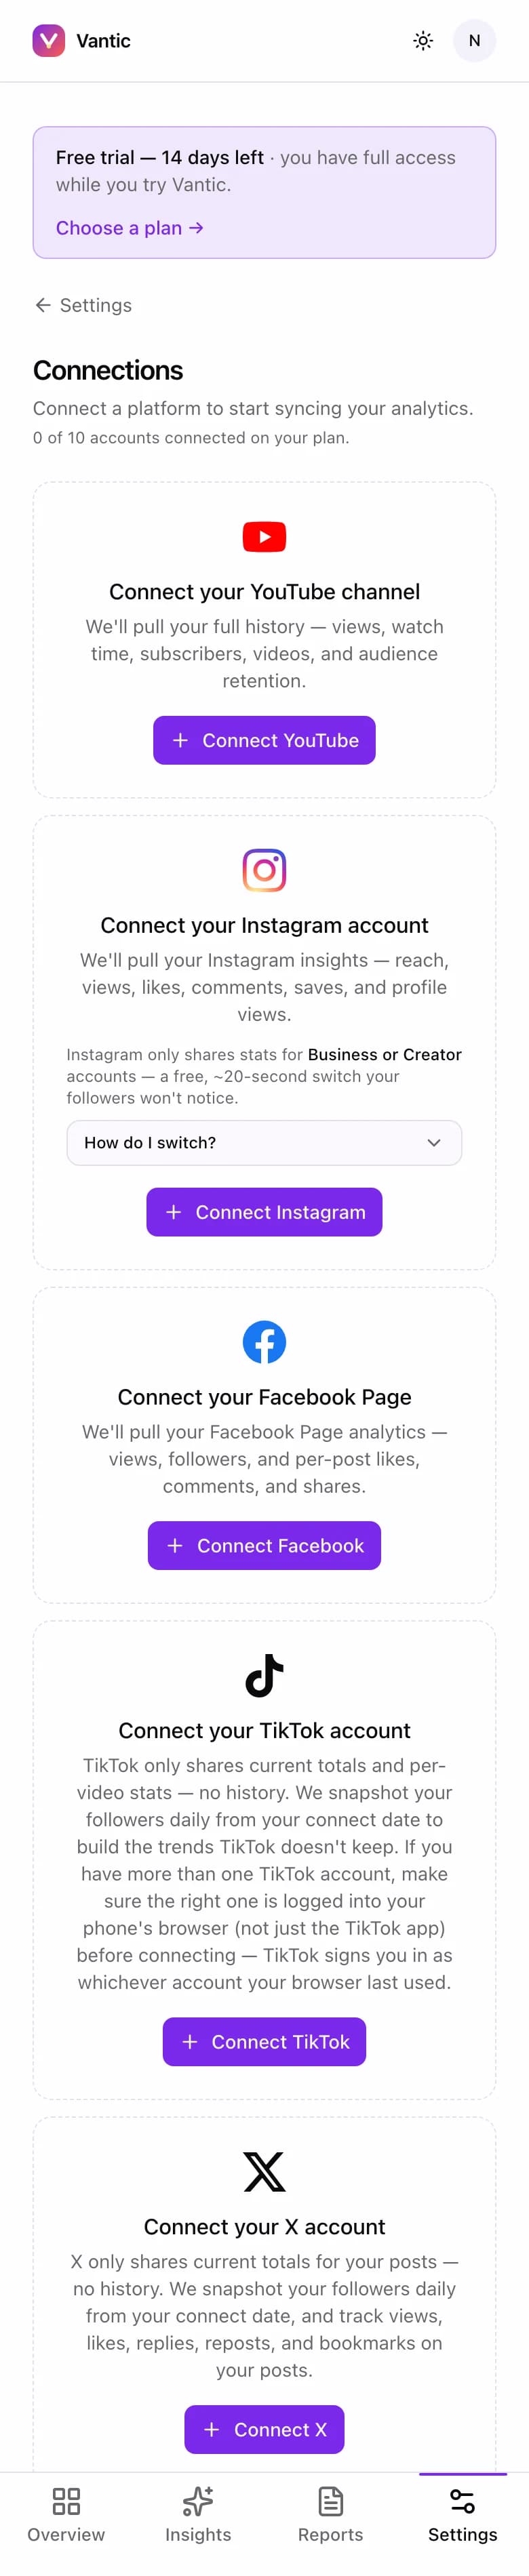
- 1. Pick a platform to connect
- 2. Each platform has its own button
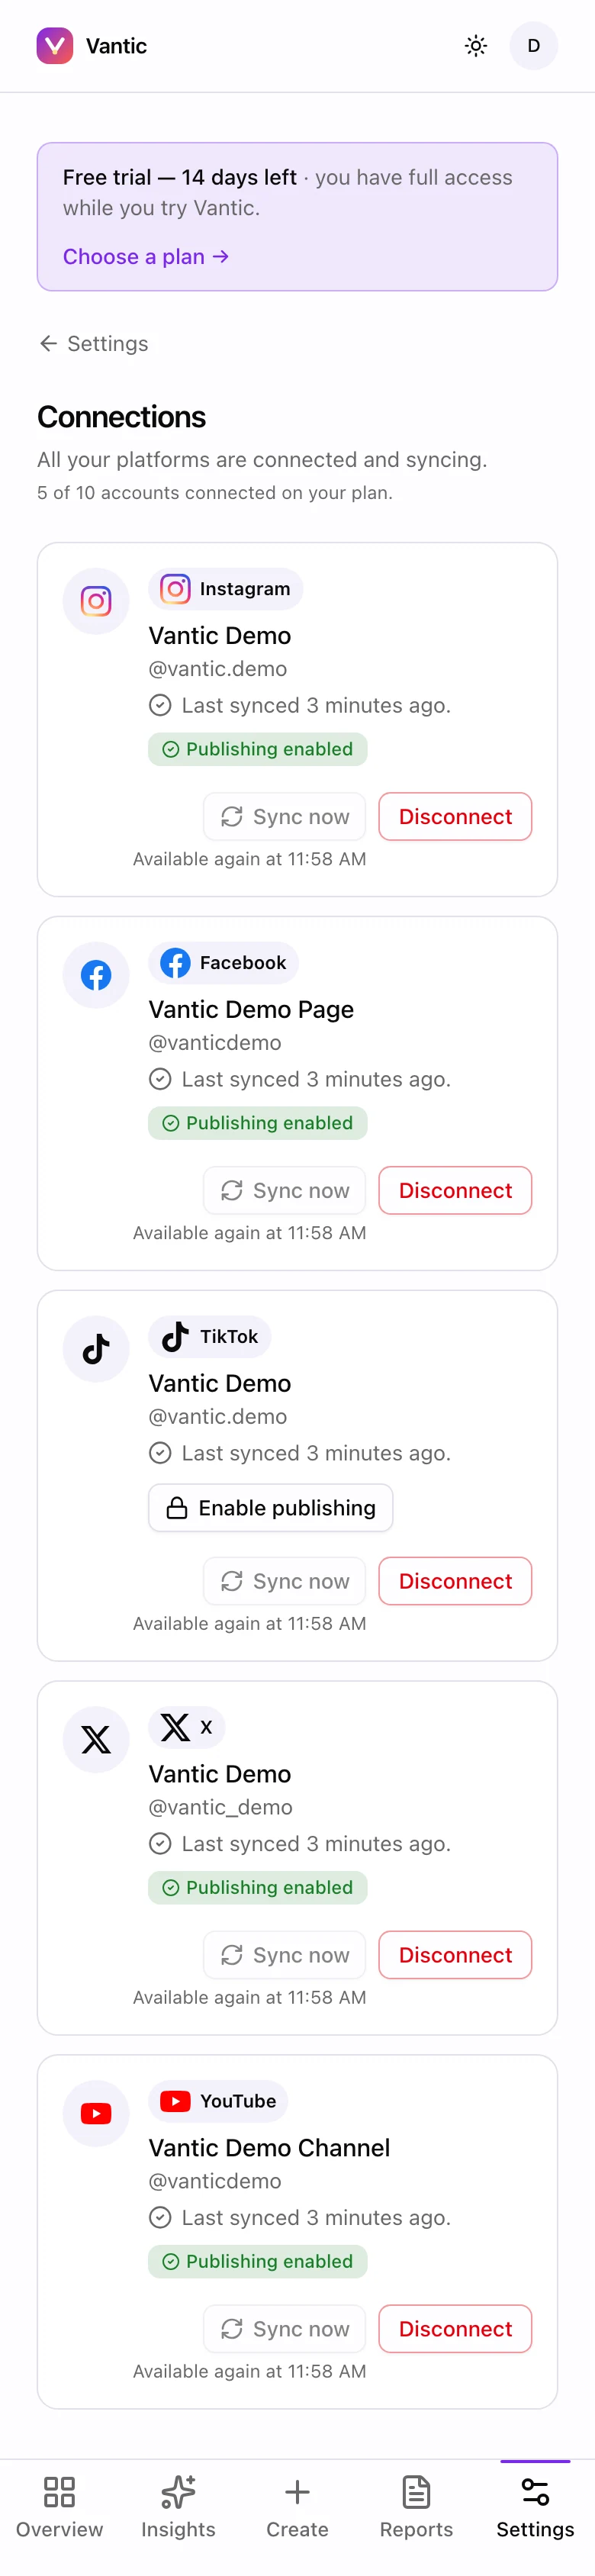
- 1. How many accounts your plan allows
- 2. Enable publishing: allow posting to this account
- 3. Sync now: refresh on demand
- 4. Disconnect: stops syncing immediately
Steps
Pick a platform
Tap Connect on YouTube, Instagram, TikTok, Facebook or X. You're sent to the platform's official sign-in page; approve access there and you land back in the app.
Let your history pull in
Your recent history fills in first, then your numbers update once a day automatically. There's nothing to export or type in.
Get the most out of it
- The top of the Connections screen shows how many accounts your plan allows, for example "5 of 10 accounts connected on your plan".
- Enable publishing gives permission to post later. It's safe to tap any time — it just asks the platform again.
- Facebook sometimes won't finish signing in on a phone (it asks for a passkey or a QR code). If that happens, tap Finish on a computer under Connect Facebook and approve on any computer signed in to Facebook — your Page then shows up on your phone.
Questions
Which platforms can I connect to Vantic?
YouTube, Instagram, TikTok, Facebook and X. Connect as many as your plan allows; each one is approved on the platform's own sign-in page.
How often do my numbers update?
Once a day, automatically. For fresh numbers right away, tap Sync now on the account in Settings → Connections; it then shows "Available again at …" for a short cooldown.
How do I disconnect an account?
Go to Settings → Connections and tap Disconnect on that account. Syncing stops immediately, and you can reconnect any time.
Step 4 · Pro plan and the free trial
Publish once, post everywhere
Upload one video from your phone and post it to every connected platform as a real post on your own account, with the right settings for each one — right away, or at a time you choose.
Where: The Create tab → Publish (Publish in the top menu on a computer).
Swipe sideways for all 8 screens.
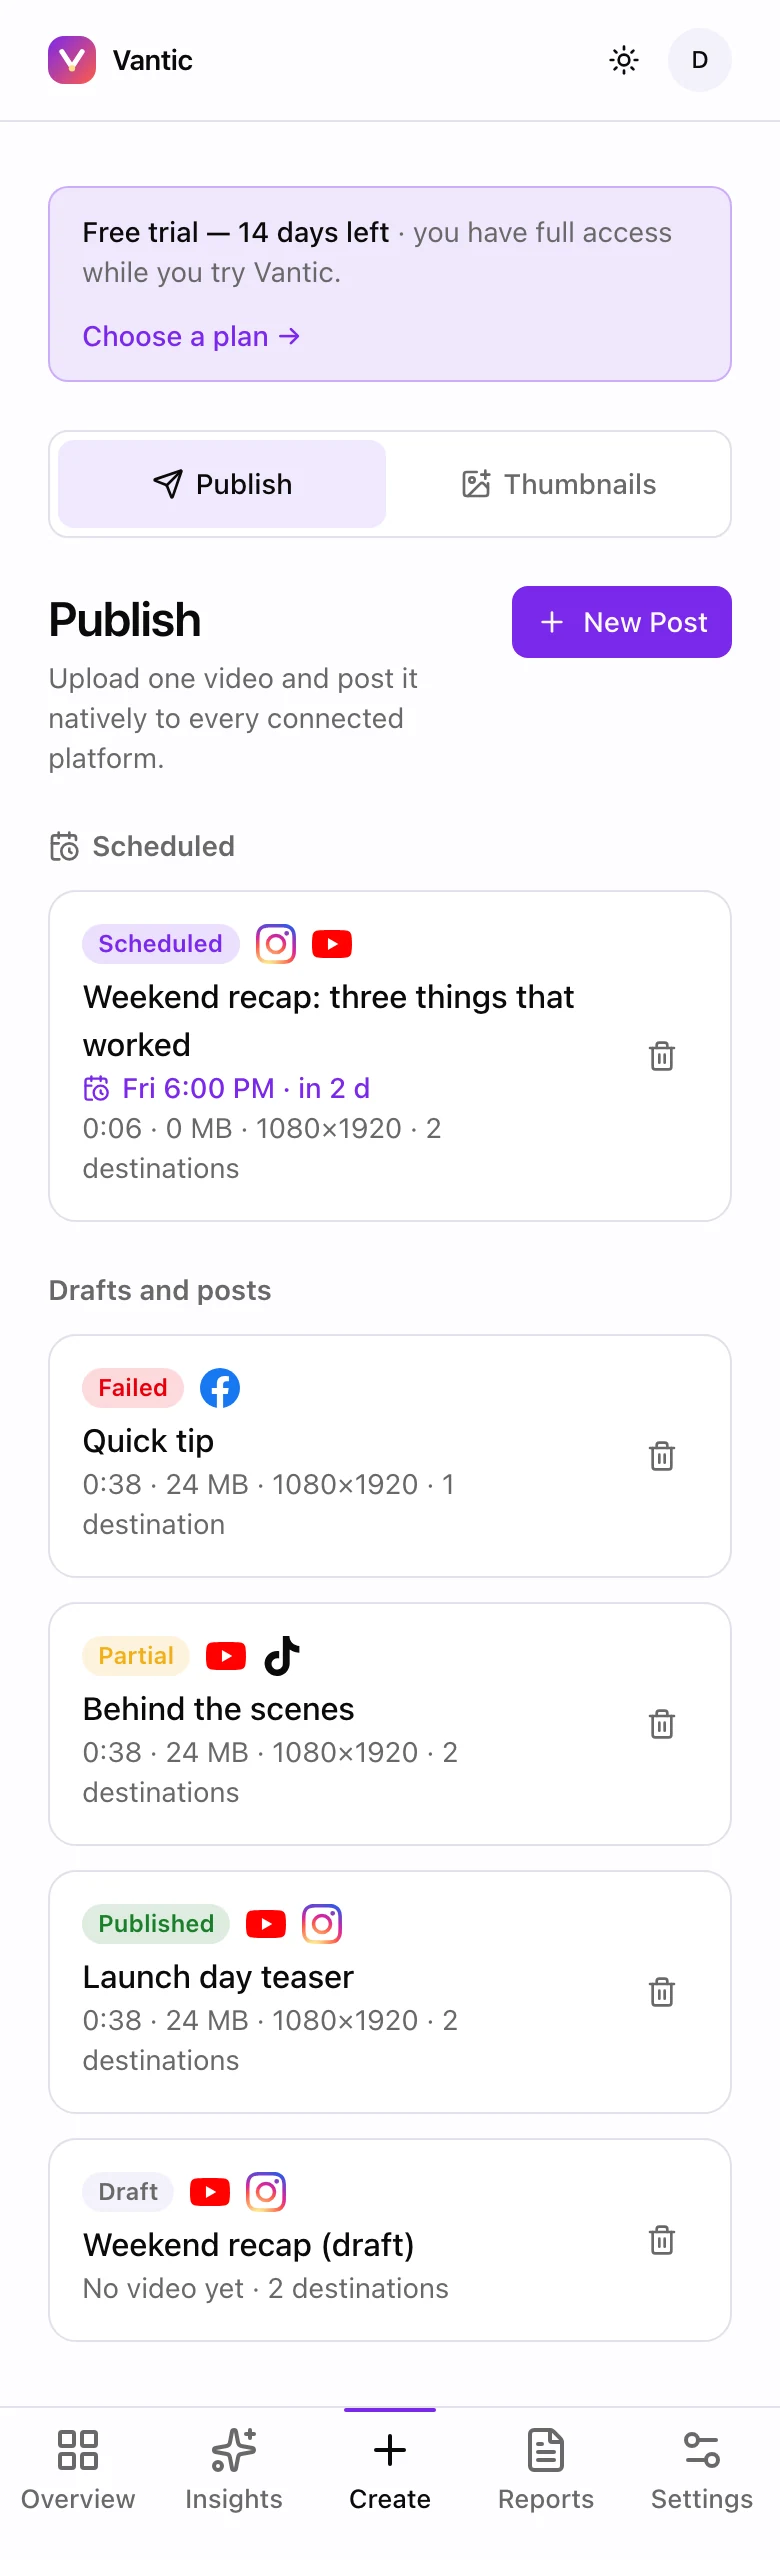
- 1. Start a new post
- 2. Scheduled posts wait here, soonest first
- 3. Status at a glance
- 4. Open a post to see each destination
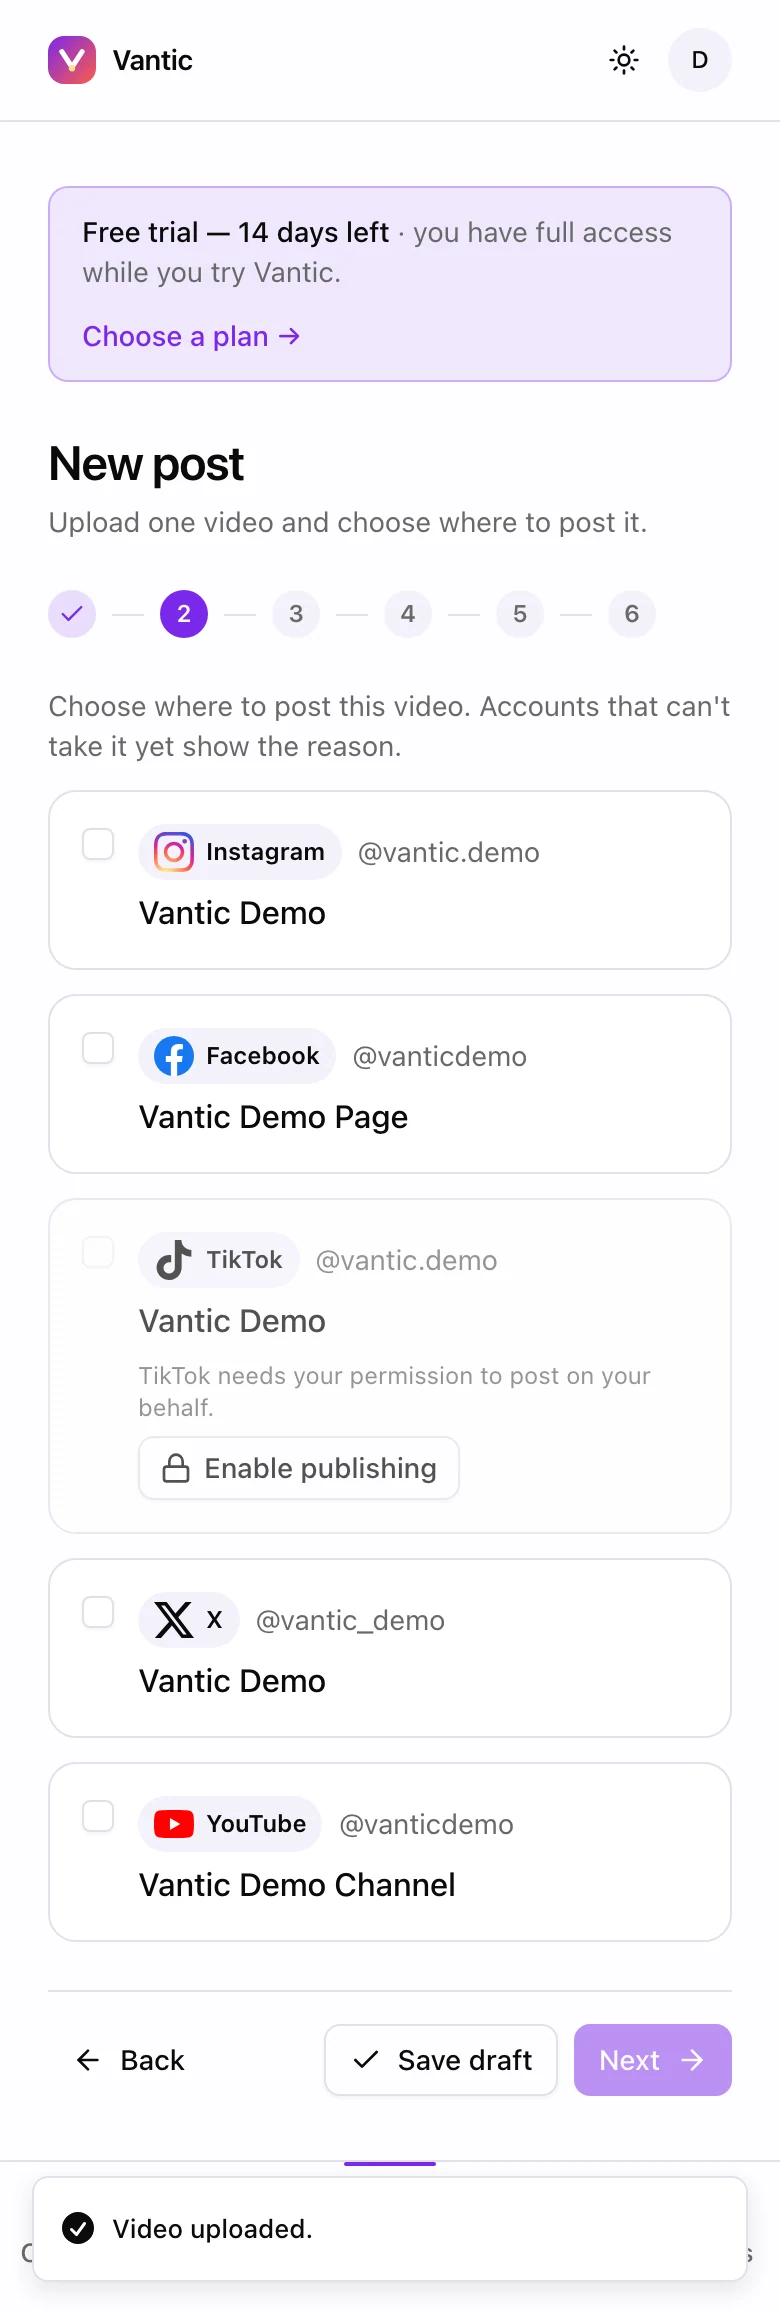
- 1. The six steps
- 2. Tick every account this video should go to
- 3. Greyed out? Enable publishing first
- 4. Save a draft and come back later
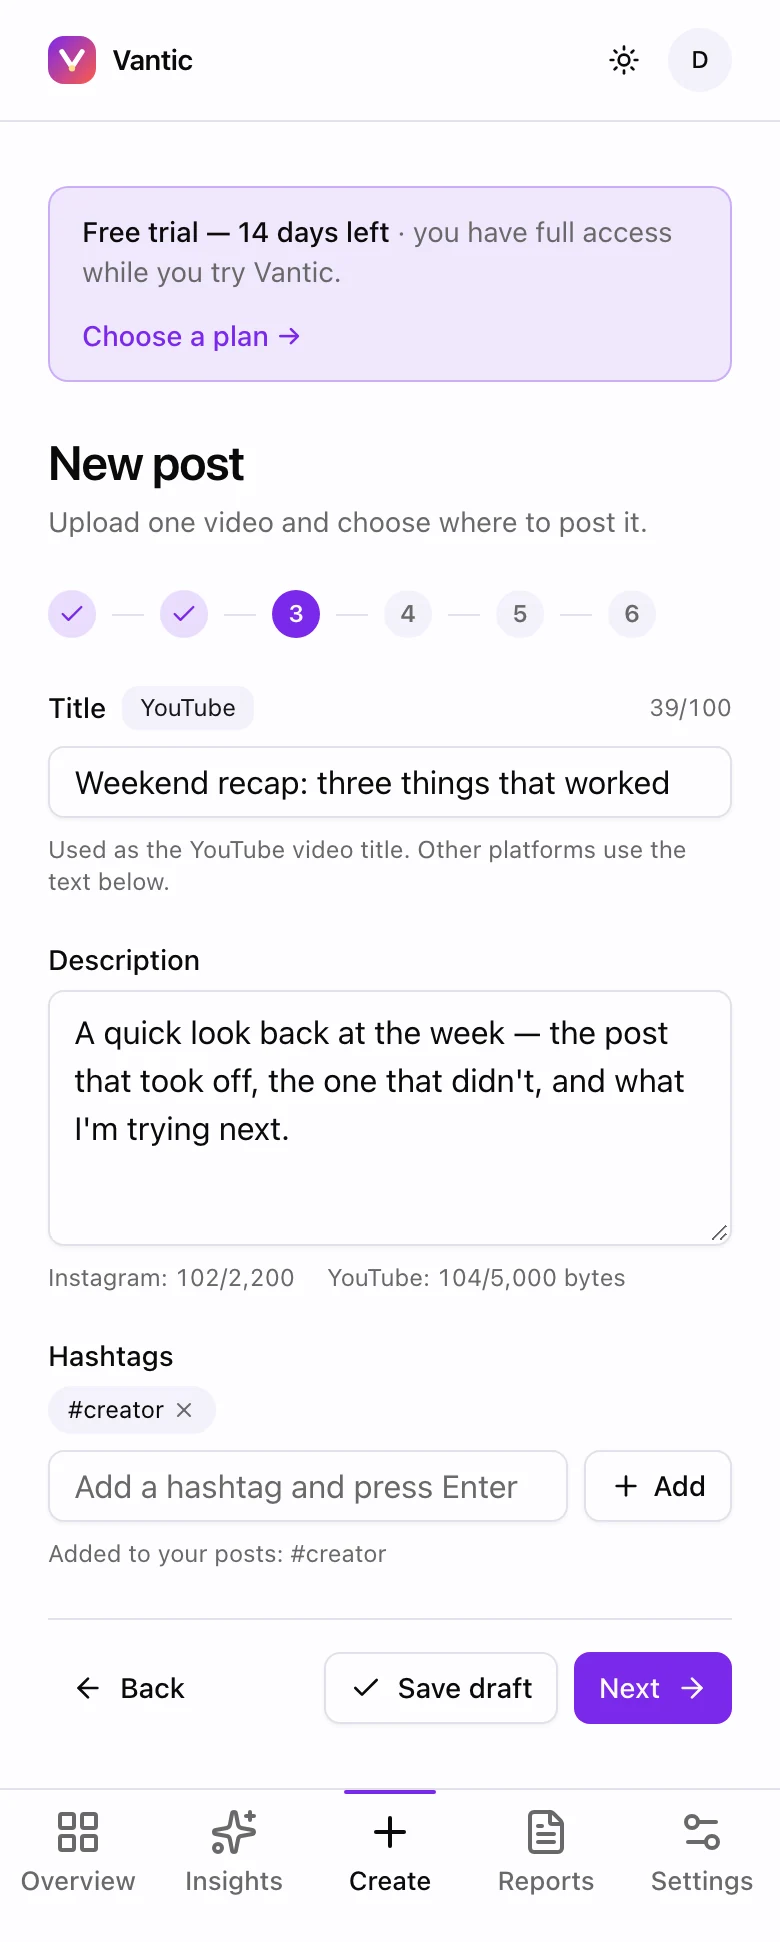
- 1. Title: used by YouTube
- 2. Description: your post text everywhere else
- 3. Hashtags, added once

- 1. One panel per destination
- 2. How it posts: Post it for me, Save as draft or Remind me
- 3. Tag people as real mentions
- 4. YouTube's own settings: who can see it, made for kids

- 1. Pick Remind me for posts you'll finish in the app
- 2. What it means, in plain words
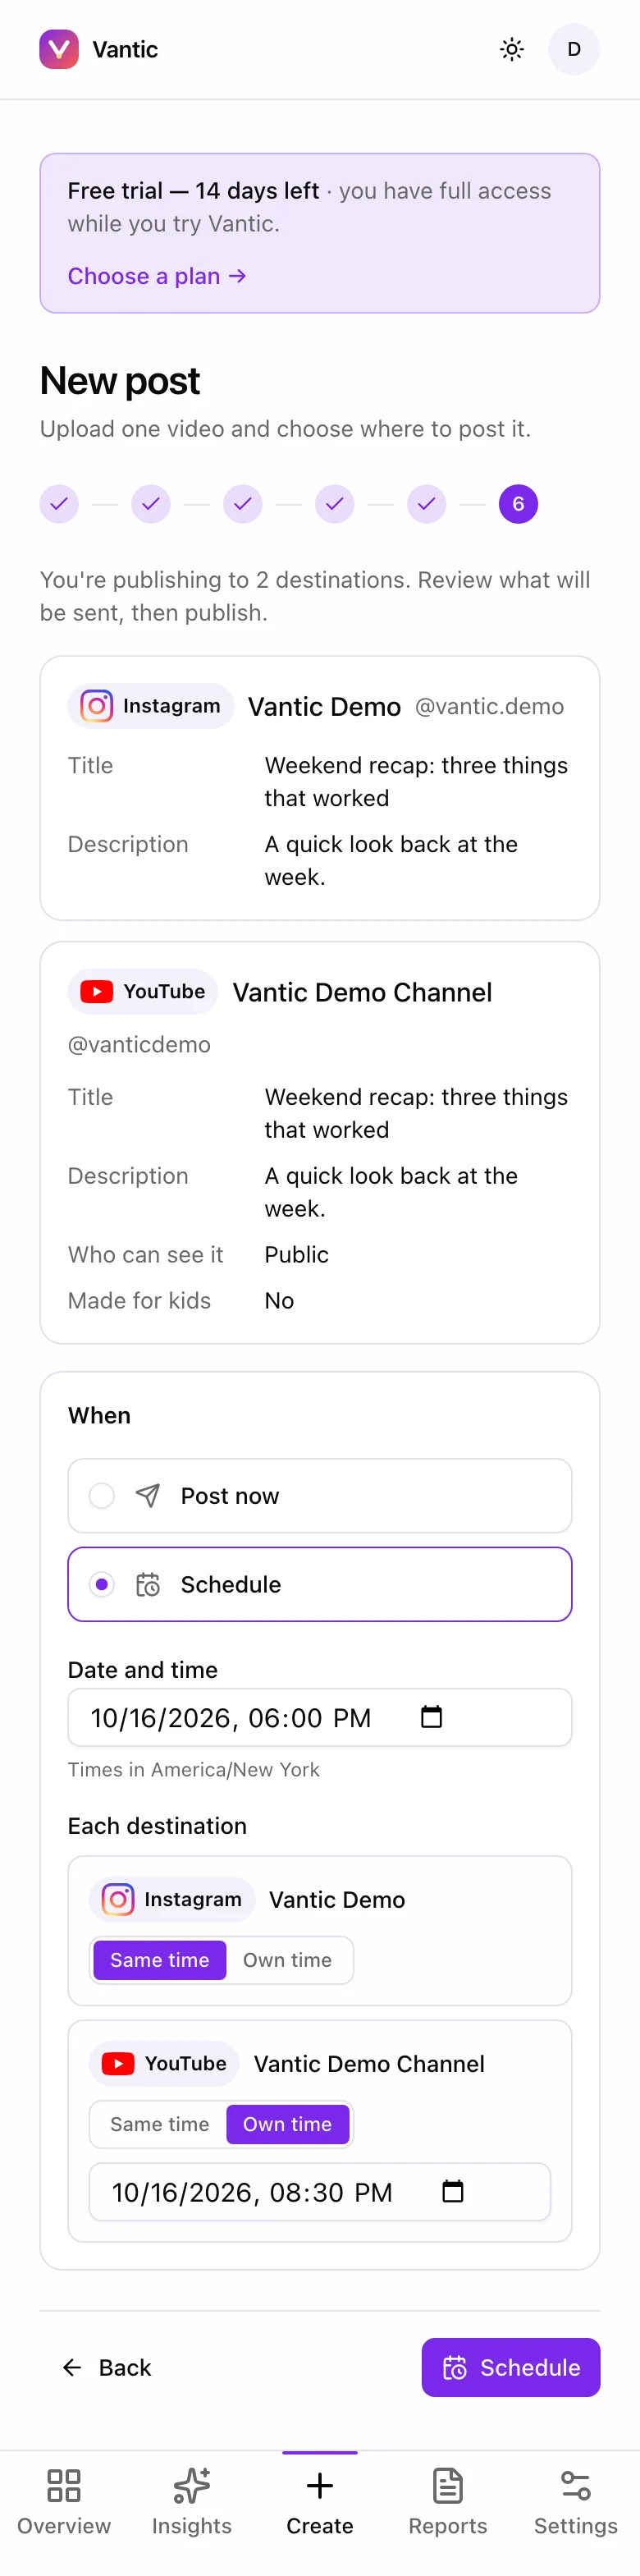
- 1. Post now, or Schedule
- 2. Pick the date and time, in your time zone
- 3. Give any destination its own time
- 4. Nothing posts until then
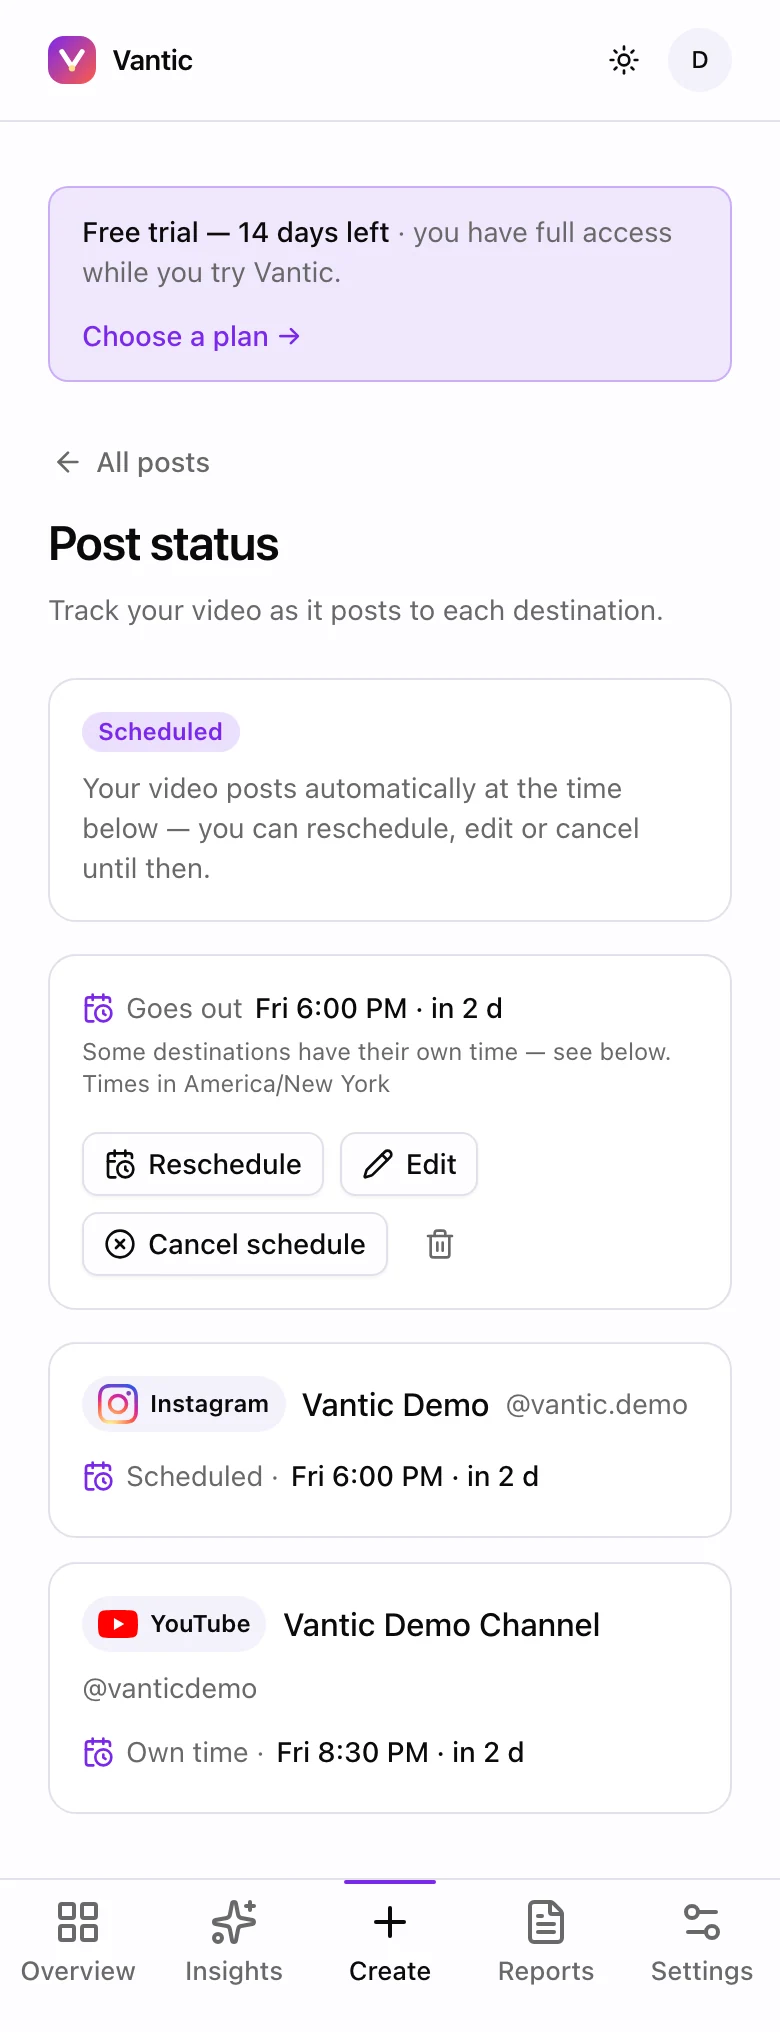
- 1. When it goes out, with a countdown
- 2. Change the time, edit, or cancel until it starts
- 3. A destination on its own time
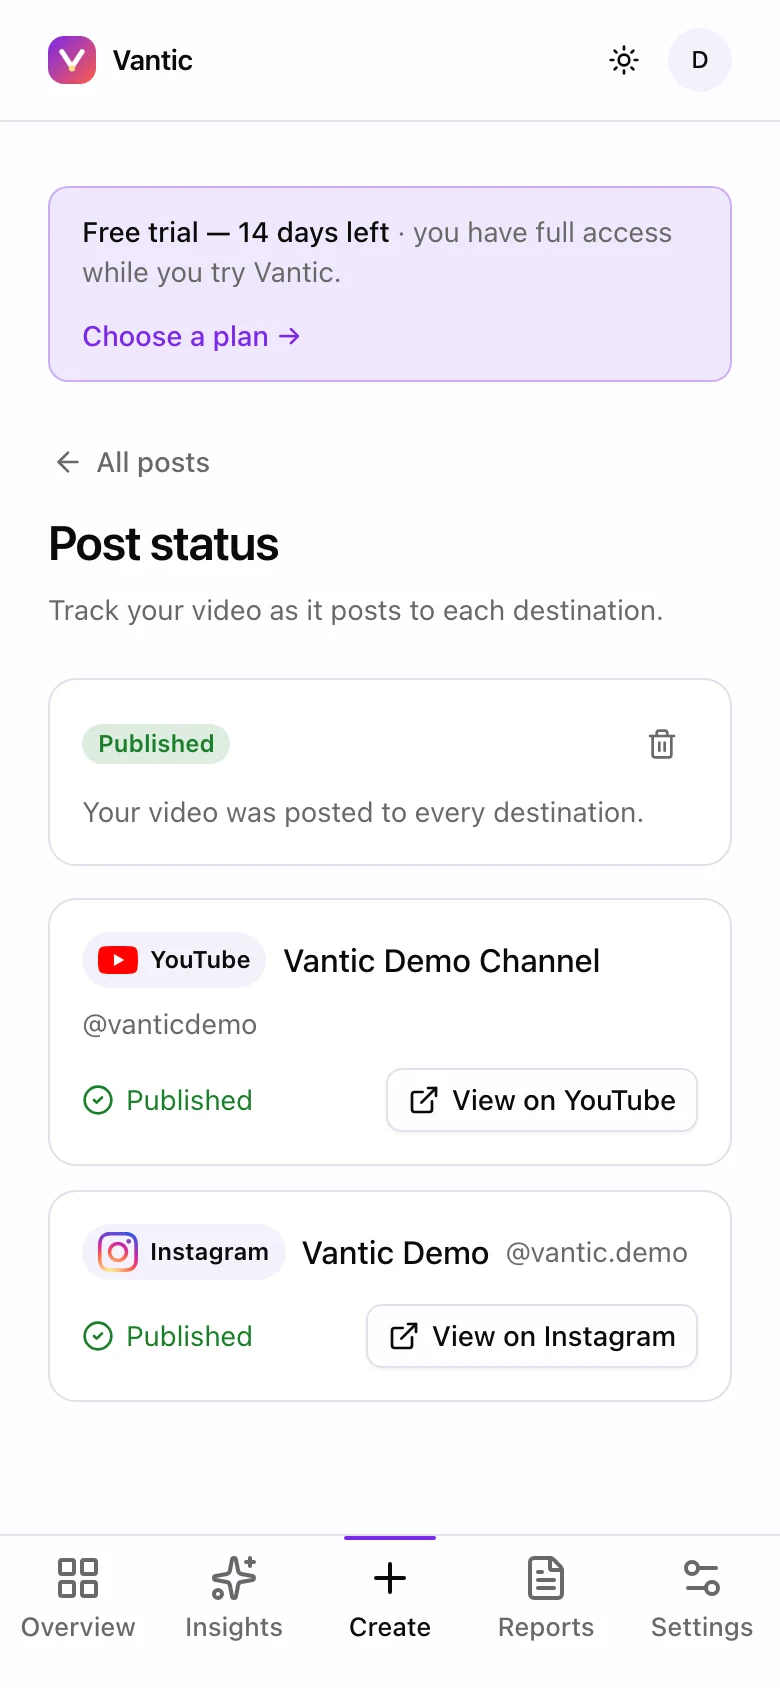
- 1. Back to all posts
- 2. Each destination reports separately
- 3. Open the live post on the platform
Steps
New Post → choose your video and destinations
Tap Choose video and pick one from your phone, then tick "Post to …" for each connected account you want. An account that's greyed out tells you why — if it just needs your permission to post, tap Enable publishing.
Write it once
The Title becomes your YouTube title; the Description becomes your YouTube description and the post text everywhere else. Live counters show how much room each platform allows.
Fine-tune each platform
Details gives each destination its own panel — YouTube's "Is this made for kids?" is the only thing you must answer; everything else you leave blank uses your title and description.
Choose how each one posts
At the top of every panel, "How it posts" offers Post it for me (the default — we post it on your account), Save as draft where the platform allows it (TikTok), and Remind me. Remind me is for posts you want to finish in the platform's own app — music, text, stickers: nothing is sent to the platform; at your chosen time your phone gets the video and caption, and you post it from there. Instagram only works this way for those extras, and the app explains why right under the choice.
Post now, or pick a time
On Review, "When" is set to Post now. Choose Schedule to pick a date and time (shown in your time zone); with more than one destination, any of them can have its Own time. The button changes to Schedule and nothing is posted until then. Scheduled posts sit at the top of your posts list with a countdown, and you can reschedule, edit, cancel or delete one until it starts.
Get the most out of it
- "Adapt for each platform" on the Details step suggests wording tailored to each platform — it's optional, and you can edit anything it writes.
- Save the people you tag often in Settings → People you tag — enter their username once per platform and they're tagged correctly everywhere.
- Save the hashtags, description footer and settings you use on most posts in Settings → Post defaults (or tap "Save these as my defaults" on a published post), then tap "Apply my defaults" on the Content step of a new post to add them in one go.
- You can Save draft at any step and come back later.
- When a Remind me post is due, you get a push alert ("Ready to post on Instagram"). Open it for the video, the caption, Save video to phone, Copy caption, Open Instagram and Mark as posted. Turn these alerts on in Settings → Notifications → Posting reminders.
Questions
Can Vantic post to all my platforms at once?
Yes, on the Pro plan and during the free trial. Upload one video, pick your connected accounts, write your title and description once, fine-tune each platform if you want, then press Publish. Nothing is posted until you press Publish.
Can I schedule posts with Vantic?
Yes. On the Review step choose Schedule, pick a date and time, and tap Schedule. You can schedule from five minutes to six months ahead, give each destination its own time, and reschedule, edit, cancel or delete the post until it starts.
What does Remind me do?
Nothing is sent to the platform. At the time you choose, Vantic sends your phone the video and caption; you finish the post in the platform's own app and share it yourself. It's the way to add music, text or stickers that only that app offers, and the only option Instagram allows for those.
Can Vantic add music or text to my Instagram post?
No app can — Instagram only lets outside apps post a finished video. Choose Remind me instead: at your chosen time your phone gets the video and caption, and you add music or text and share it in the Instagram app.
Can I save a video to my TikTok drafts?
Yes. Set TikTok's "How it posts" to Save to TikTok drafts. The video lands in that account's drafts inside the TikTok app, where you add the caption, sounds and settings before posting.
What happens if a post fails on one platform?
The post shows as Partial or Failed in your posts list. Open it to see each platform separately and tap Retry on the one that didn't go through; once it's up, "View on YouTube" (or Instagram, and so on) takes you to it.
What settings can I change per platform?
On the Details step: YouTube — who can see it and whether it's made for kids. TikTok — privacy level and whether to allow comments, Duet and Stitch. Instagram — caption, tagged people, collaborators and cover frame. X — the post text. Anything you leave blank uses your title and description.
How do I add hashtags?
On the Content step, type each hashtag and press Enter. They're added to every destination that supports them.
Step 5
Your Overview
The Overview is your home screen: every connected account on one page, with what moved in the last 28 days. One look tells you how things are going.
Where: The Overview tab at the bottom of your screen (top of the screen on a computer).
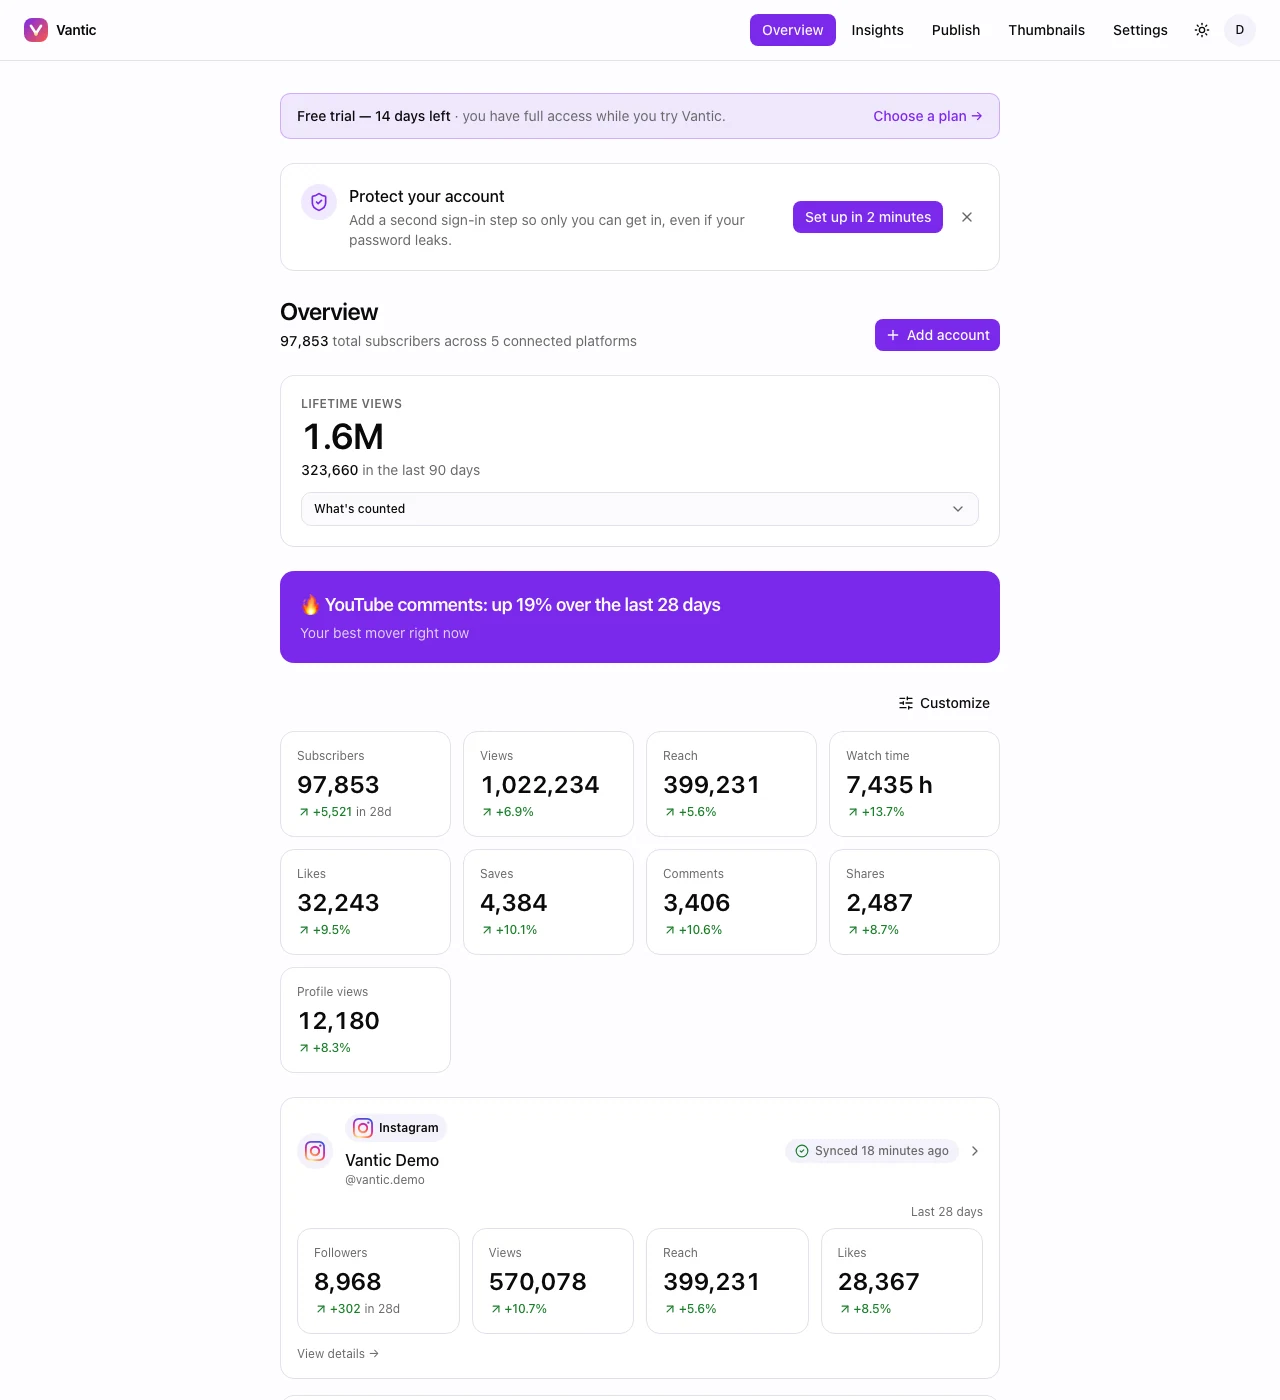
- 1. Your total across every connected platform
- 2. Your best mover: the metric that moved most in 28 days
- 3. Customize: reorder or hide metrics
- 4. Each metric with its 28-day change
- 5. One card per account — tap for the full picture
- 6. Add another account any time
Steps
Read the top
A single line adds up your audience across every platform, and "Your best mover right now" picks out the metric that moved the most in the last 28 days.
Open an account
Each connected account has its own card with four headline numbers. Tap "View details →" to go deeper.
Get the most out of it
- Tap Customize to choose which numbers show and in what order (see Customize your metrics below).
- On a computer, the menu across the top reads Overview · Insights · Publish · Thumbnails · Settings. Publish appears on the Pro plan and during the free trial; Thumbnails appears when you have that add-on.
Questions
What do the green and red numbers on the Overview mean?
Each number shows its change over the last 28 days — green when it went up, red when it went down.
Step 6
Account pages: one platform, deeper
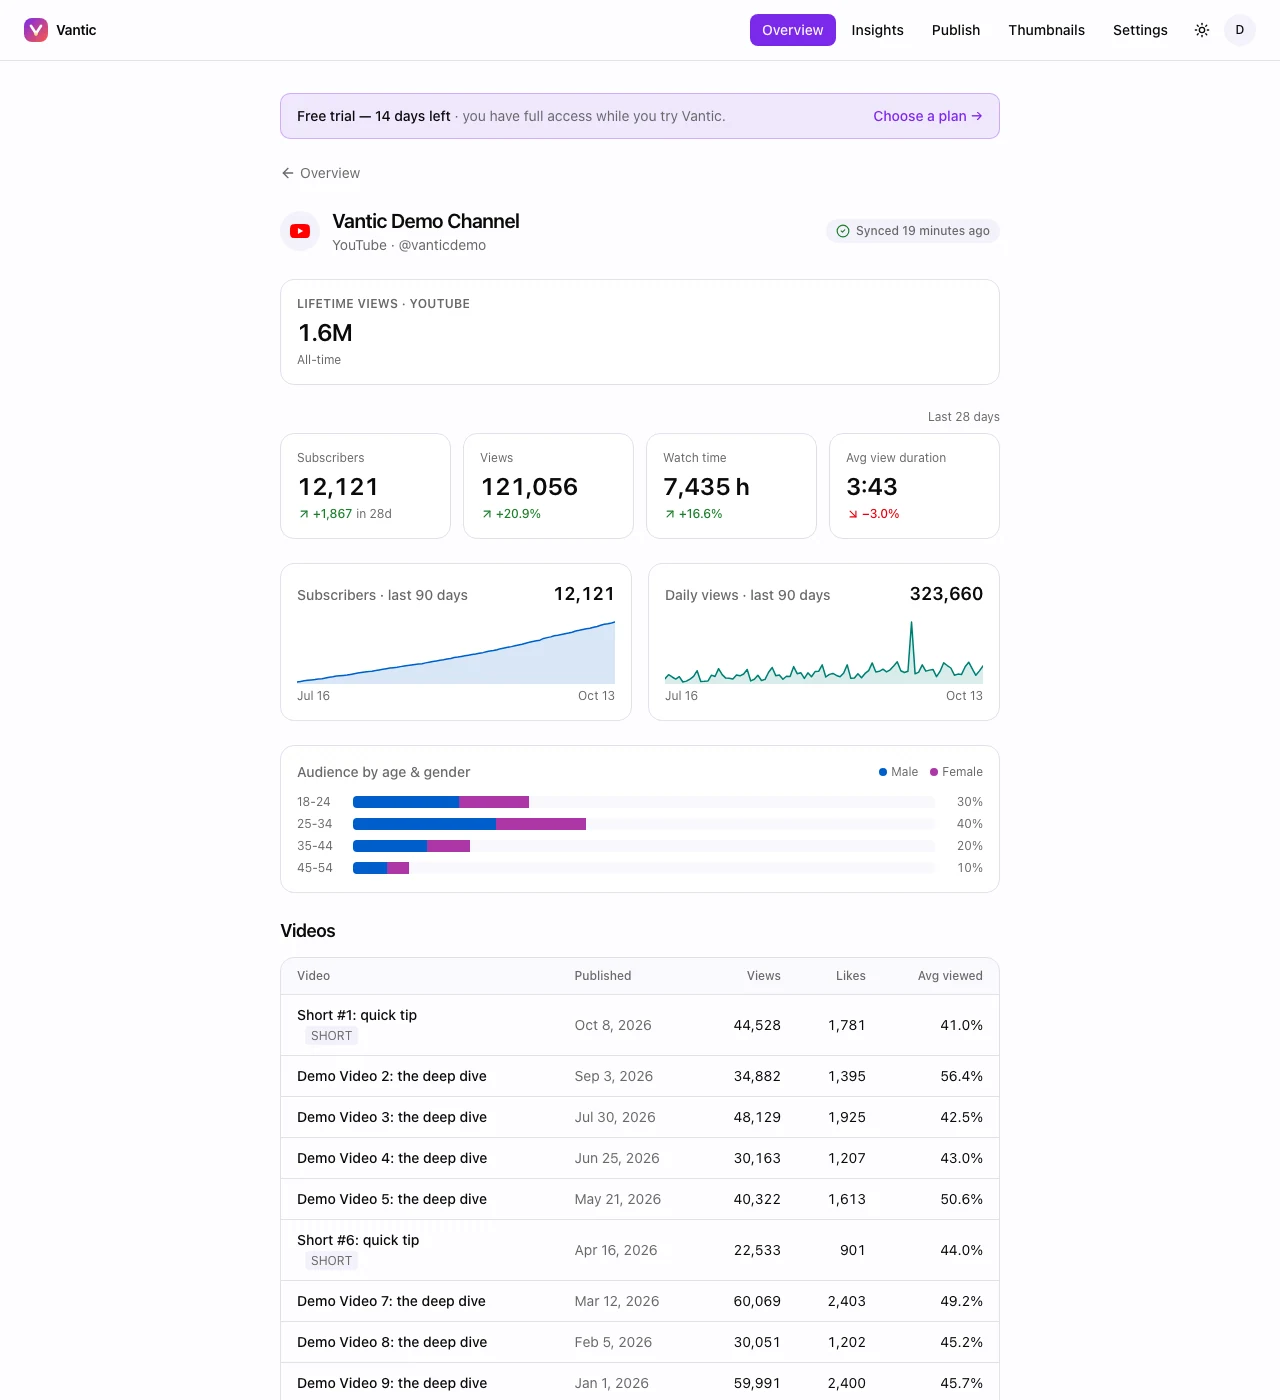
Every connected account gets its own page with longer charts, your audience and your videos or posts ranked by how they did — so "what worked?" is a scroll, not an investigation.
Where: Tap an account card on the Overview, or "View details →".
Swipe sideways for all 2 screens.

- 1. When this account last refreshed
- 2. Lifetime views: your all-time total
- 3. The last 28 days, with change
- 4. 90-day trend charts
- 5. Who's watching, by age and gender
- 6. Every video, ranked — tap one for its own page
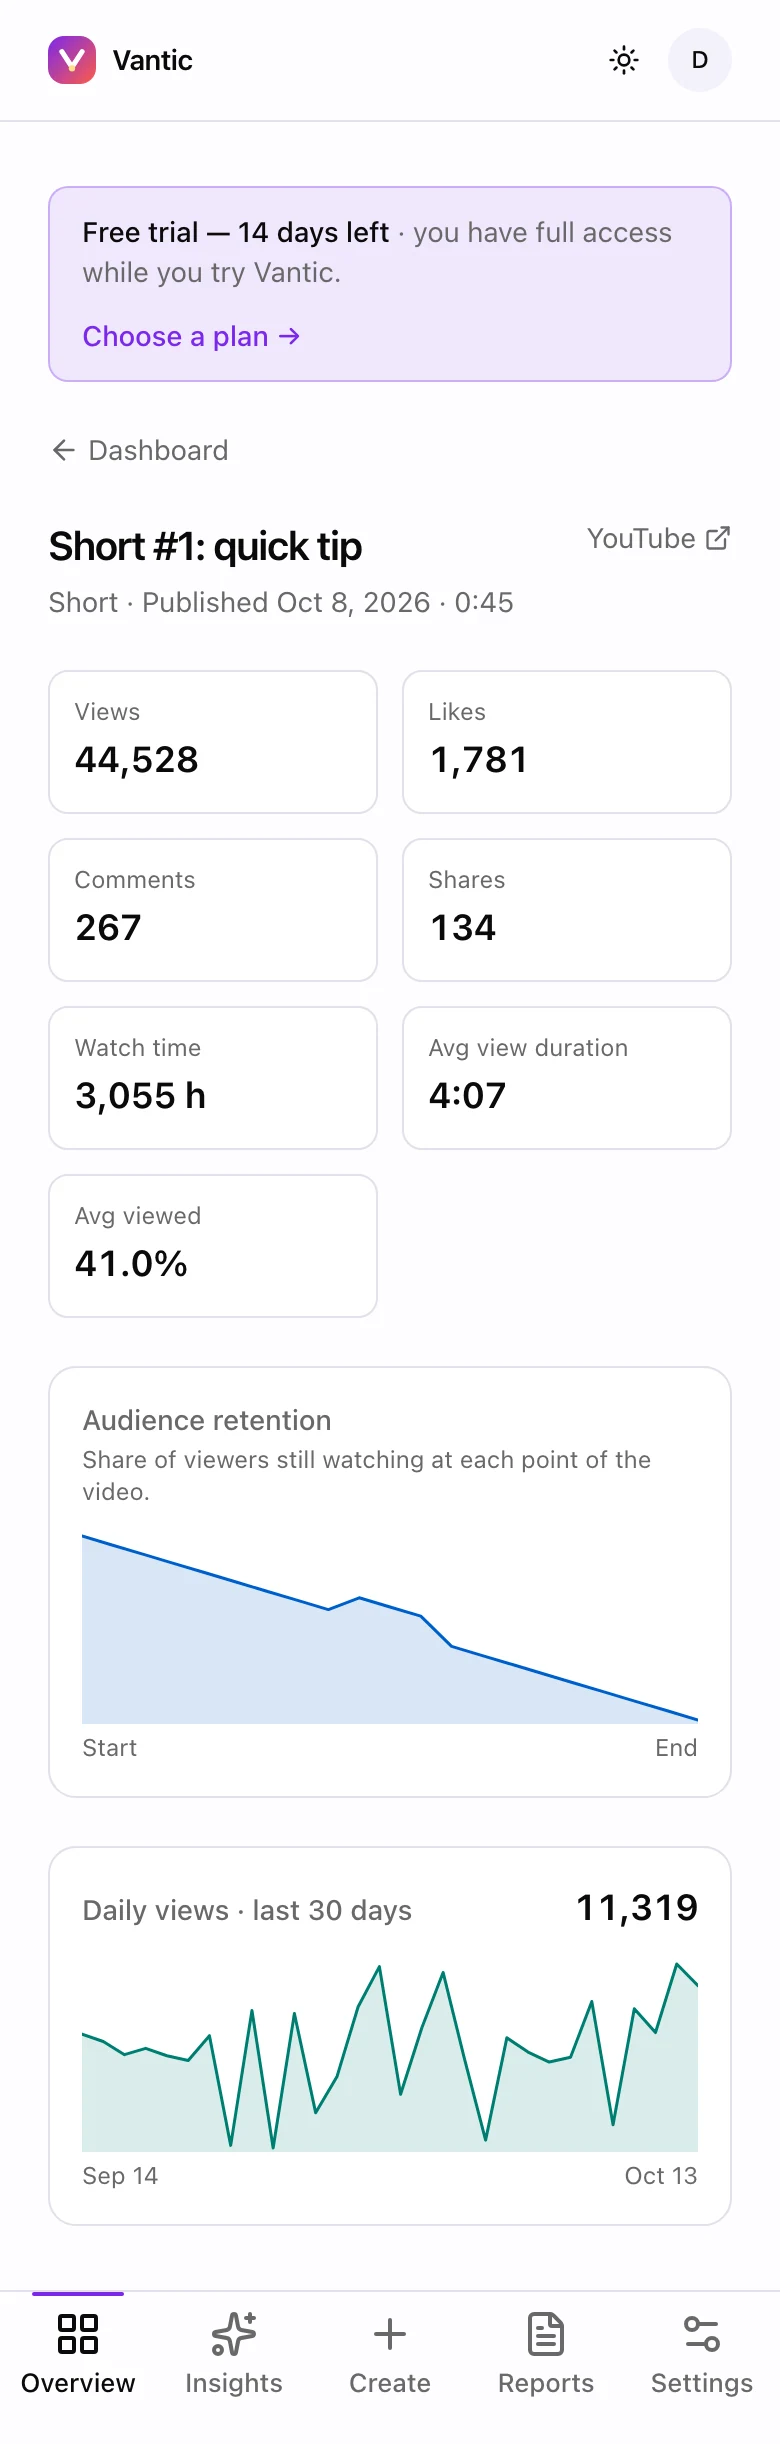
- 1. Back to the channel
- 2. How much of the video people actually watch
Steps
Lifetime views and the last 28 days
Lifetime views is your all-time total (a brand-new connection shows "Still calculating…" until it's ready). Below it are the numbers that only make sense for that platform — on YouTube: Subscribers, Views, Watch time and Avg view duration.
Trends, then what worked
The 90-day charts show the shape of your growth, "Audience by age & gender" appears where the platform provides it, and your videos or posts are listed by how well they did. Tap a YouTube video for its own page.
Get the most out of it
- Compare your top video's Avg viewed % with the rest — it often shows what kept people watching.
Questions
What does a video page show?
Views, Likes, Comments, Shares, Watch time, Avg view duration and Avg viewed % for that one video.
Step 7
Insights & alerts
Insights write up what changed in plain English — a spike worth riding, a drop worth checking, a trend building. Alerts bring the important ones to your phone.
Where: The Insights tab; alert settings are in Settings → Notifications.
Swipe sideways for all 2 screens.
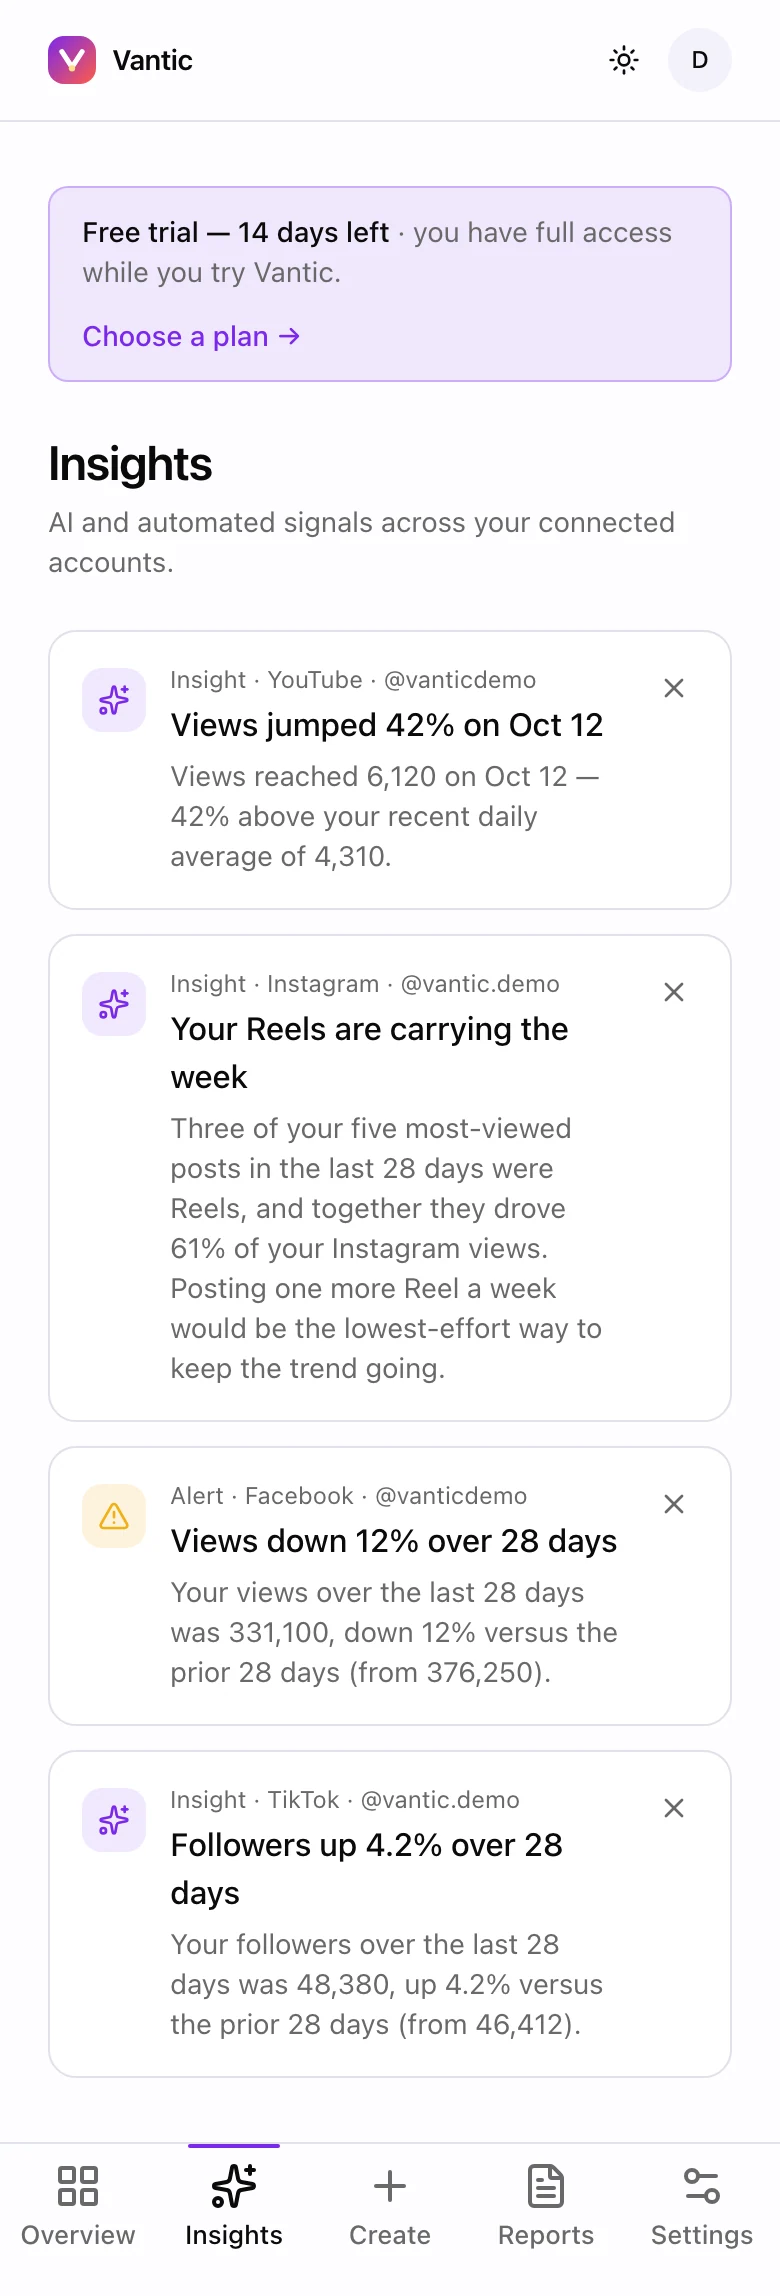
- 1. A spike worth knowing about
- 2. An AI write-up, checked against your real numbers
- 3. A warning when something slips
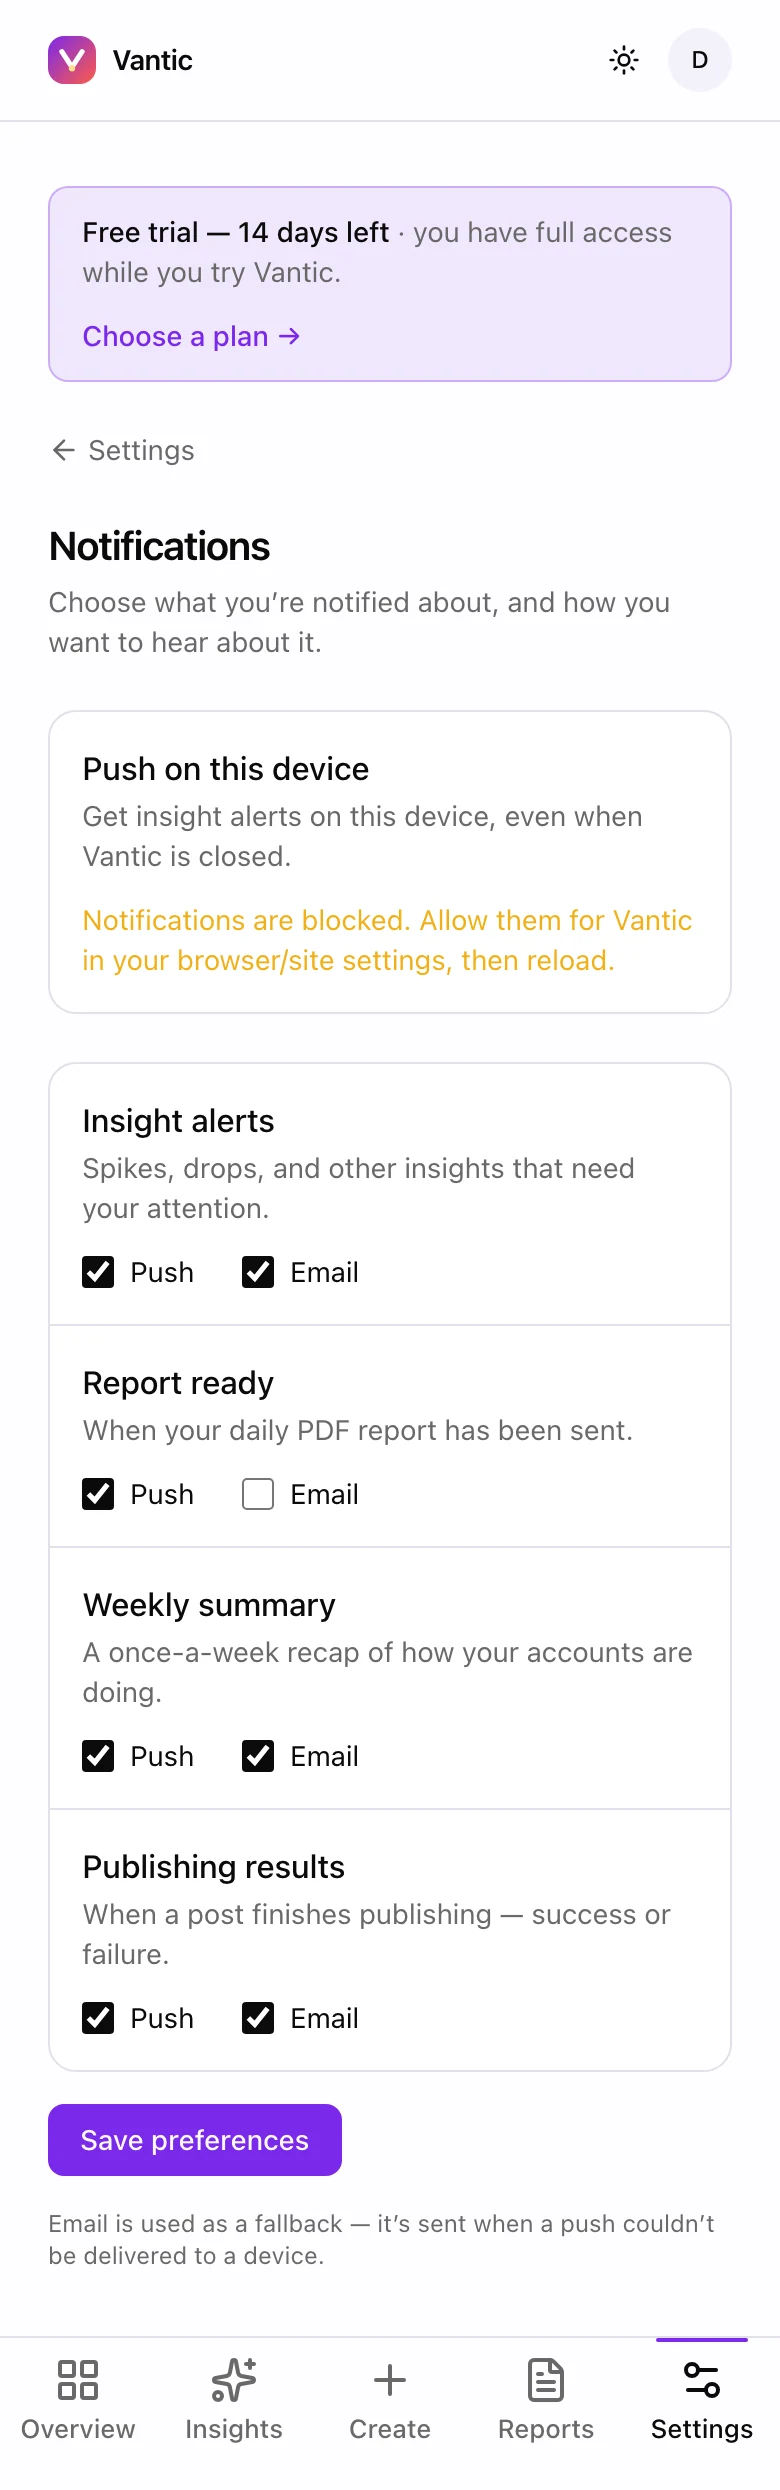
- 1. Allow push alerts on this device
- 2. Pick push, email or both per category
- 3. Save your choices
Steps
Read the Insights tab
Each card is tied to one of your accounts and marked info, warning or critical, so you know what needs a look first. Some spot spikes, drops and trends in your numbers; others are short written summaries.
Turn on alerts
In Settings → Notifications, turn on "Push on this device", pick what you want (Insight alerts, Report ready, Weekly summary, Publishing results, Posting reminders) and tap Save preferences.
Get the most out of it
- Every number in a written insight is checked against your real data before you see it, so the summary can't make a figure up.
- Push is set per device — turn it on on each phone or computer you use. If a push can't be delivered, the alert comes by email instead.
Questions
How does Vantic make sure AI insights are accurate?
Every number in a written insight is checked against your real data before it's shown. If a figure doesn't match, the insight isn't shown.
Can I get alerts on my phone?
Yes. Install Vantic on your phone, then go to Settings → Notifications and turn on "Push on this device". If a push can't be delivered, you get an email instead.
Step 8
The daily email report
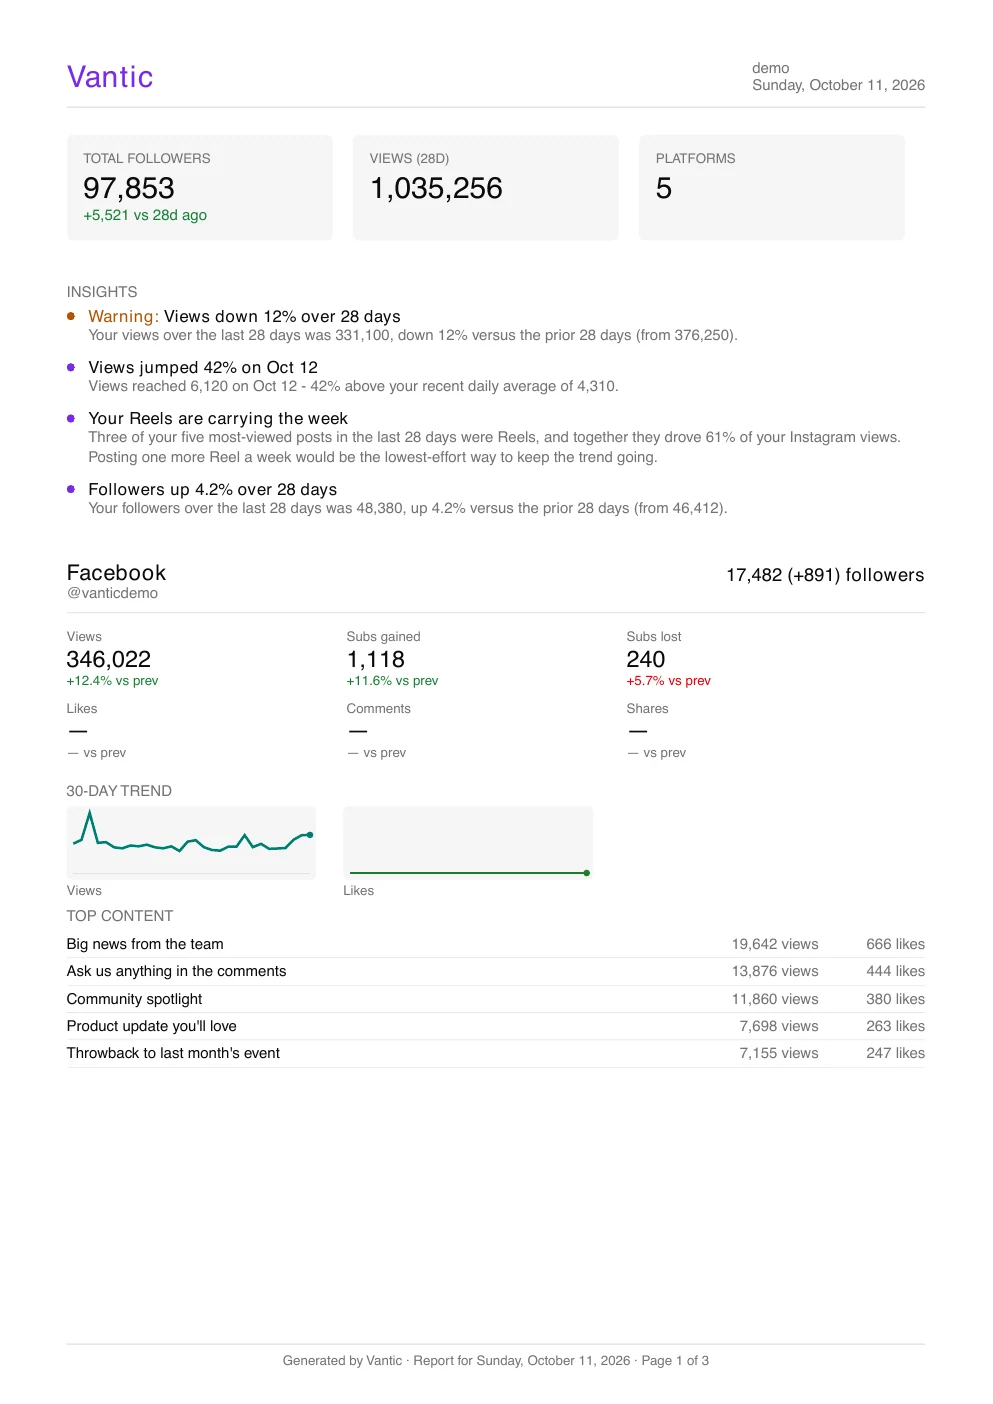
A short PDF in your inbox every morning, in your time zone: where you stand, what changed since yesterday and which posts moved the needle.
Where: The Reports tab (also Settings → Reports).
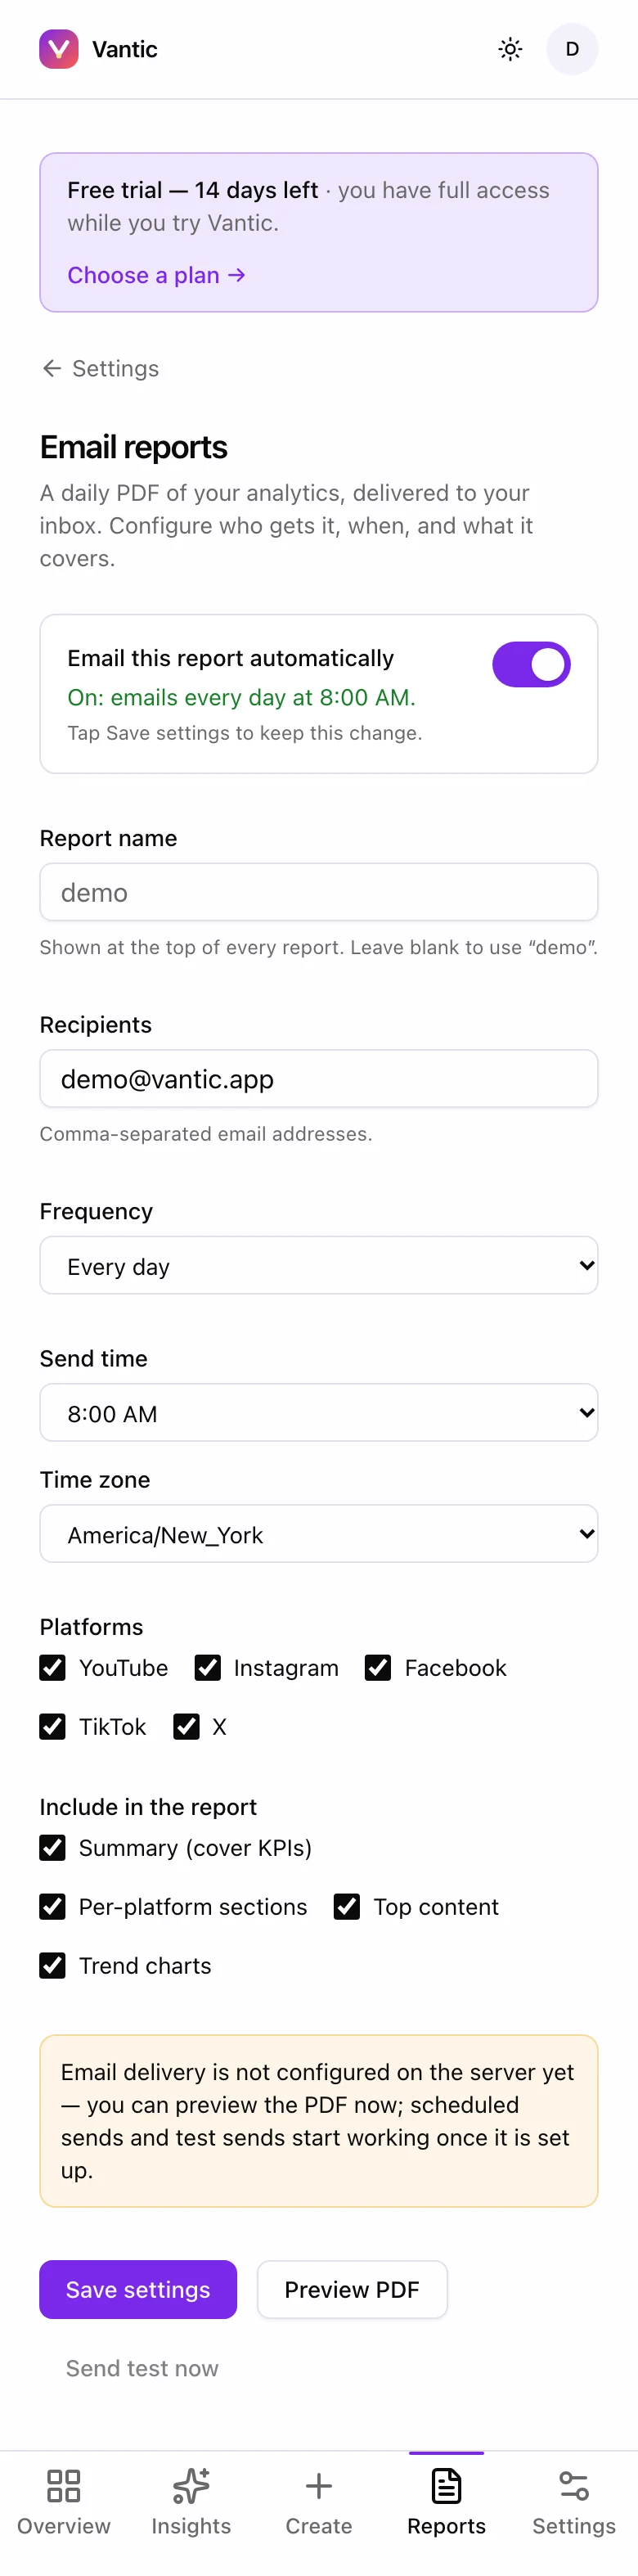
- 1. Turn the daily email on or off
- 2. Who receives it
- 3. How often and when, in your time zone
- 4. Which platforms to include
- 5. Which sections to include
- 6. Preview the PDF or send yourself a test
Steps
Turn it on and pick a time
Switch on "Email this report automatically" (it starts on), add Recipients, then choose the Frequency, Send time and Time zone.
Choose what's in it, then try it
Tick the Platforms to include and what goes in (Summary, Per-platform sections, Top content, Trend charts). Save settings, then Send test now to see it in your inbox.
Get the most out of it
- Each number shows whether it went up or down since yesterday, so you can read the report in seconds.
- Add a manager or editor as a recipient so they see the numbers without needing a login.
Questions
Can I turn the daily report off?
Yes. Switch off "Email this report automatically" in Settings → Reports and tap Save settings, or use the unsubscribe link in any report email.
Can I send the report to someone else?
Yes. Add their email to Recipients in Settings → Reports, separated by commas.
Can I see the report before it's sent?
Yes. Preview PDF in Settings → Reports shows it right away, and Send test now emails you a copy.
Step 9 · Creator and Pro plans
Your media kit
One shareable page of your stats to send to brands. You choose what's on it, and it stays private until you switch it on.
Where: Settings → Media kit
Swipe sideways for all 2 screens.

- 1. Publish: off means the link shows nothing
- 2. Your shareable link
- 3. Choose which accounts appear
- 4. Save
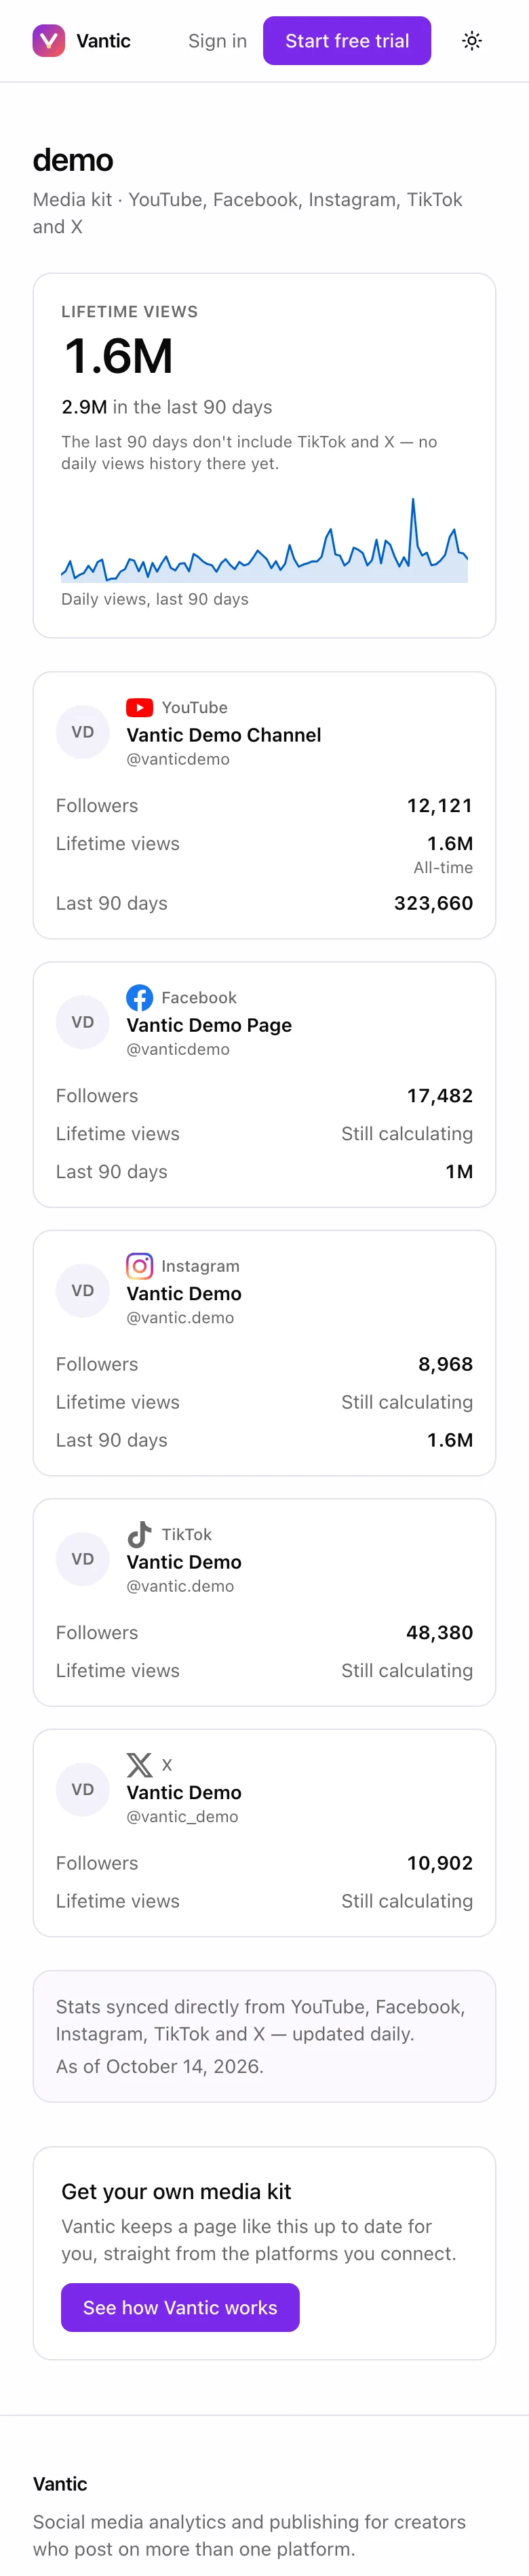
- 1. What a brand sees — always current, nothing private
Steps
Pick your link and what's on it
Choose your handle for /kit/<handle>, fill in the Name shown on the page and tick the "Accounts to show".
Switch it on
Turn on "Publish my media kit", tap Save media kit, then copy your link and send it to brands.
Get the most out of it
- Changing your link retires the old one, so pick a handle you'll keep.
- The numbers update by themselves, so the link you sent last month is still current. Switch it off any time and the link shows nothing.
Questions
What does my media kit show brands?
Only what you choose: the accounts you tick, with their lifetime views, followers and last 90 days. Your email, plan and payments, audience demographics, individual posts and insights are never shown.
What can my media kit link look like?
Your link is /kit/ followed by a handle of 3 to 32 characters: lowercase letters, numbers and dashes.
Step 10 · Thumbnail Studio add-on
Thumbnail Studio
Design YouTube thumbnails on your phone, starting from your own expression photos, with feedback tailored to your kind of channel.
Where: The Create tab → Thumbnails (Thumbnails in the top menu on a computer).
Swipe sideways for all 4 screens.
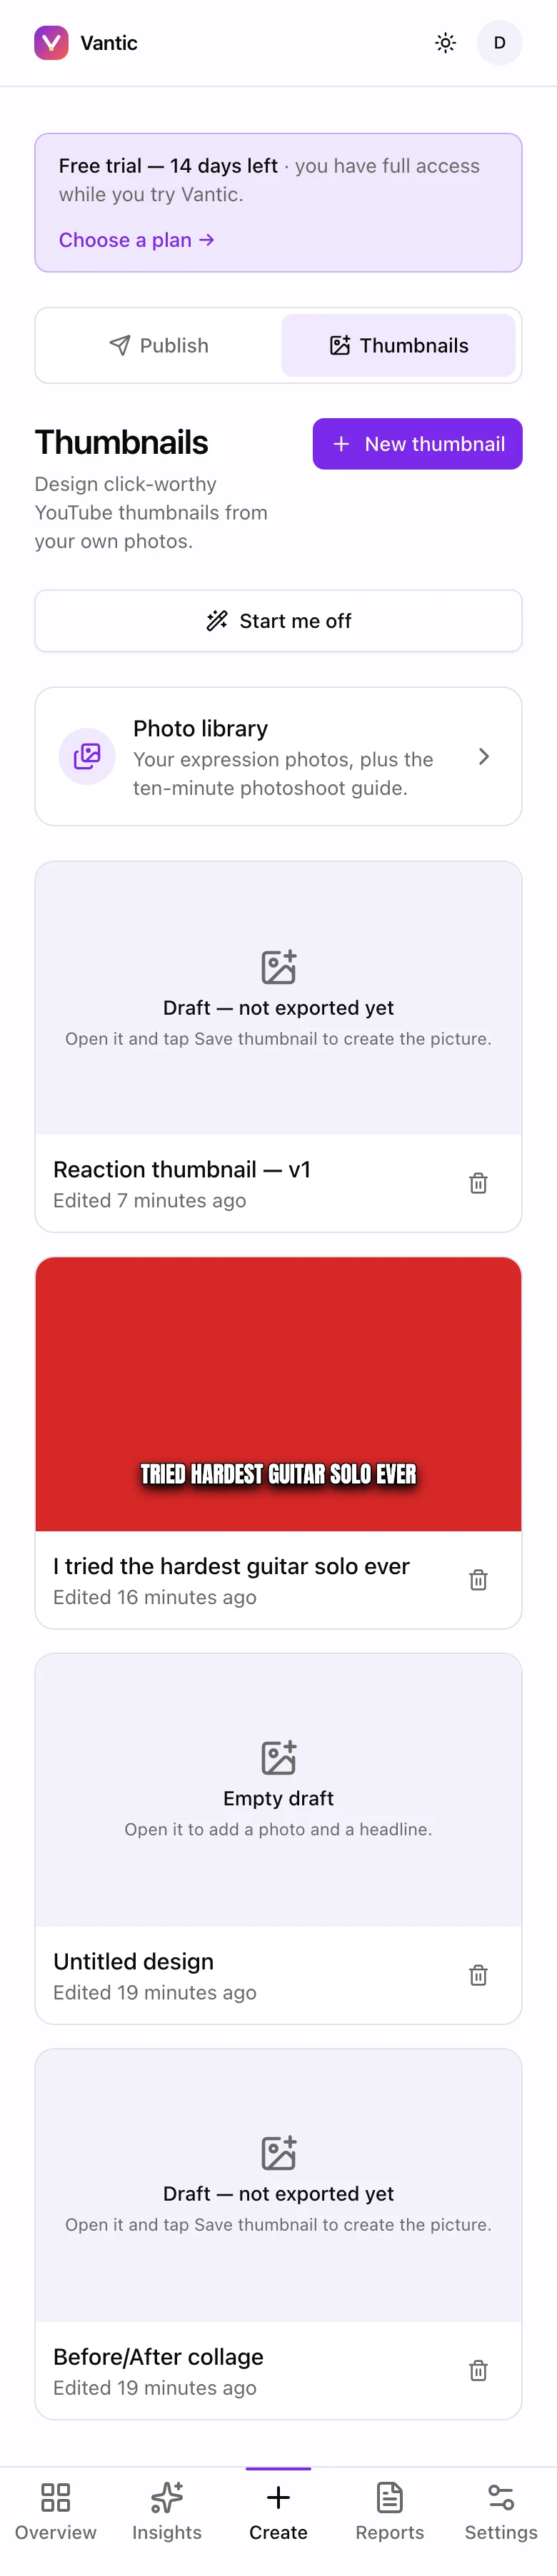
- 1. Start from a blank canvas
- 2. Or let it draft one for you
- 3. Your expression photos and the photoshoot guide
- 4. Your designs
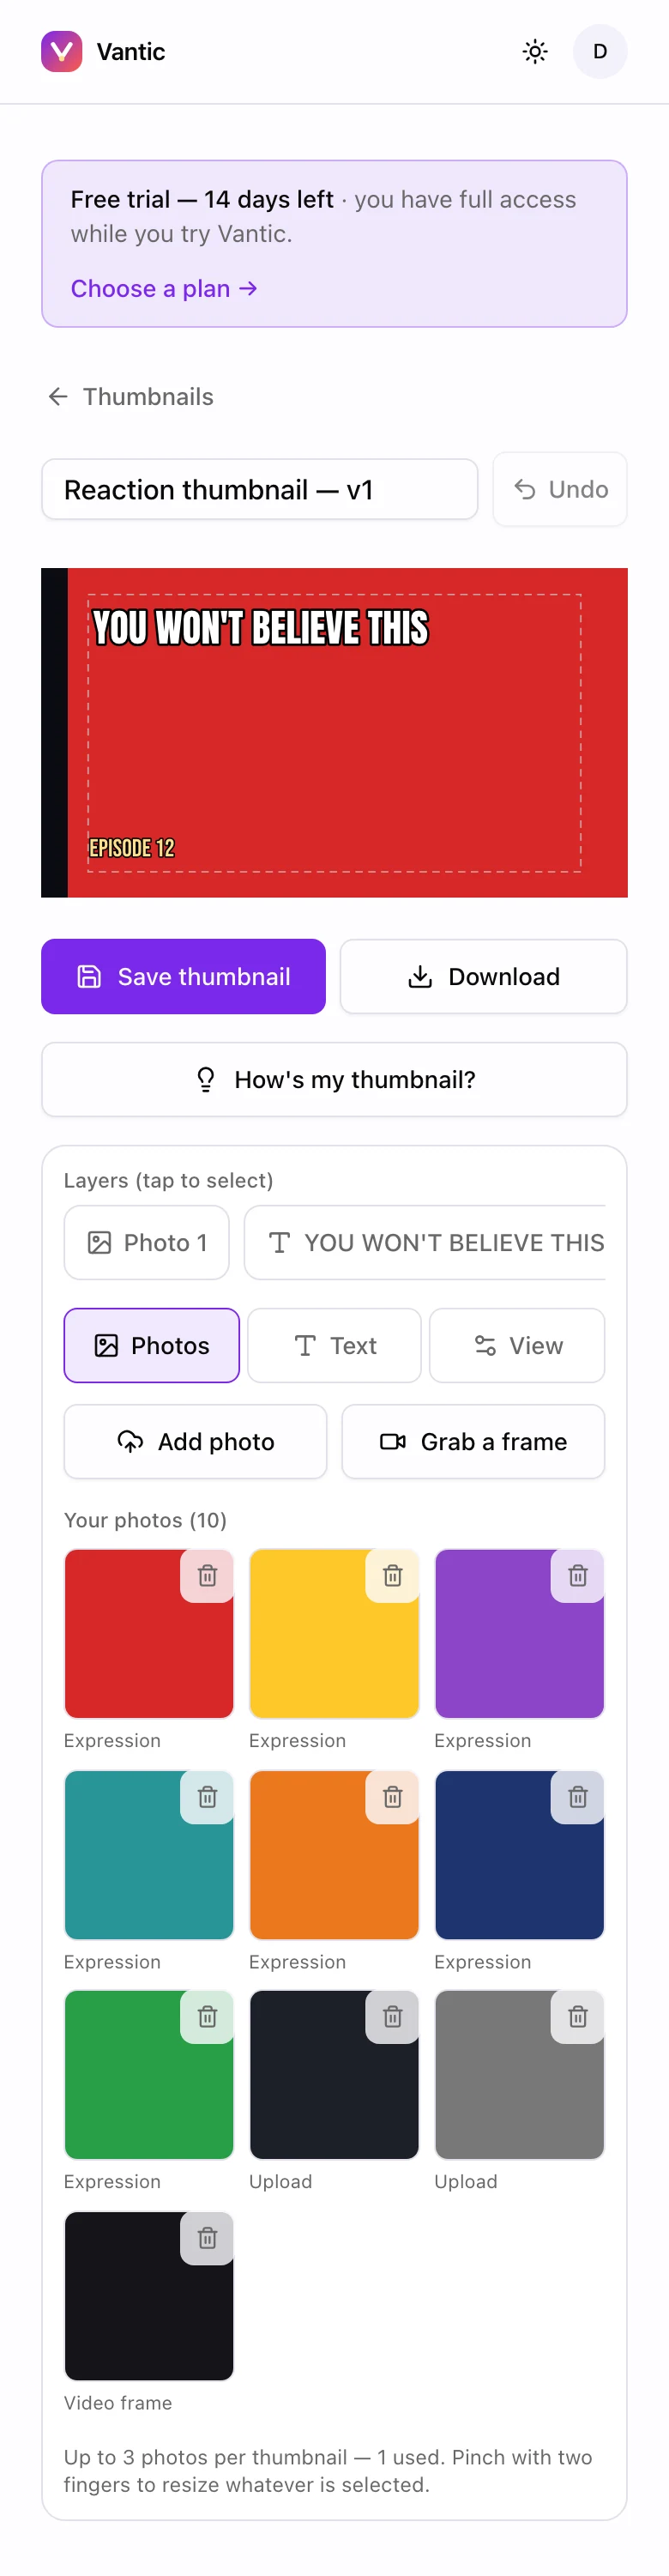
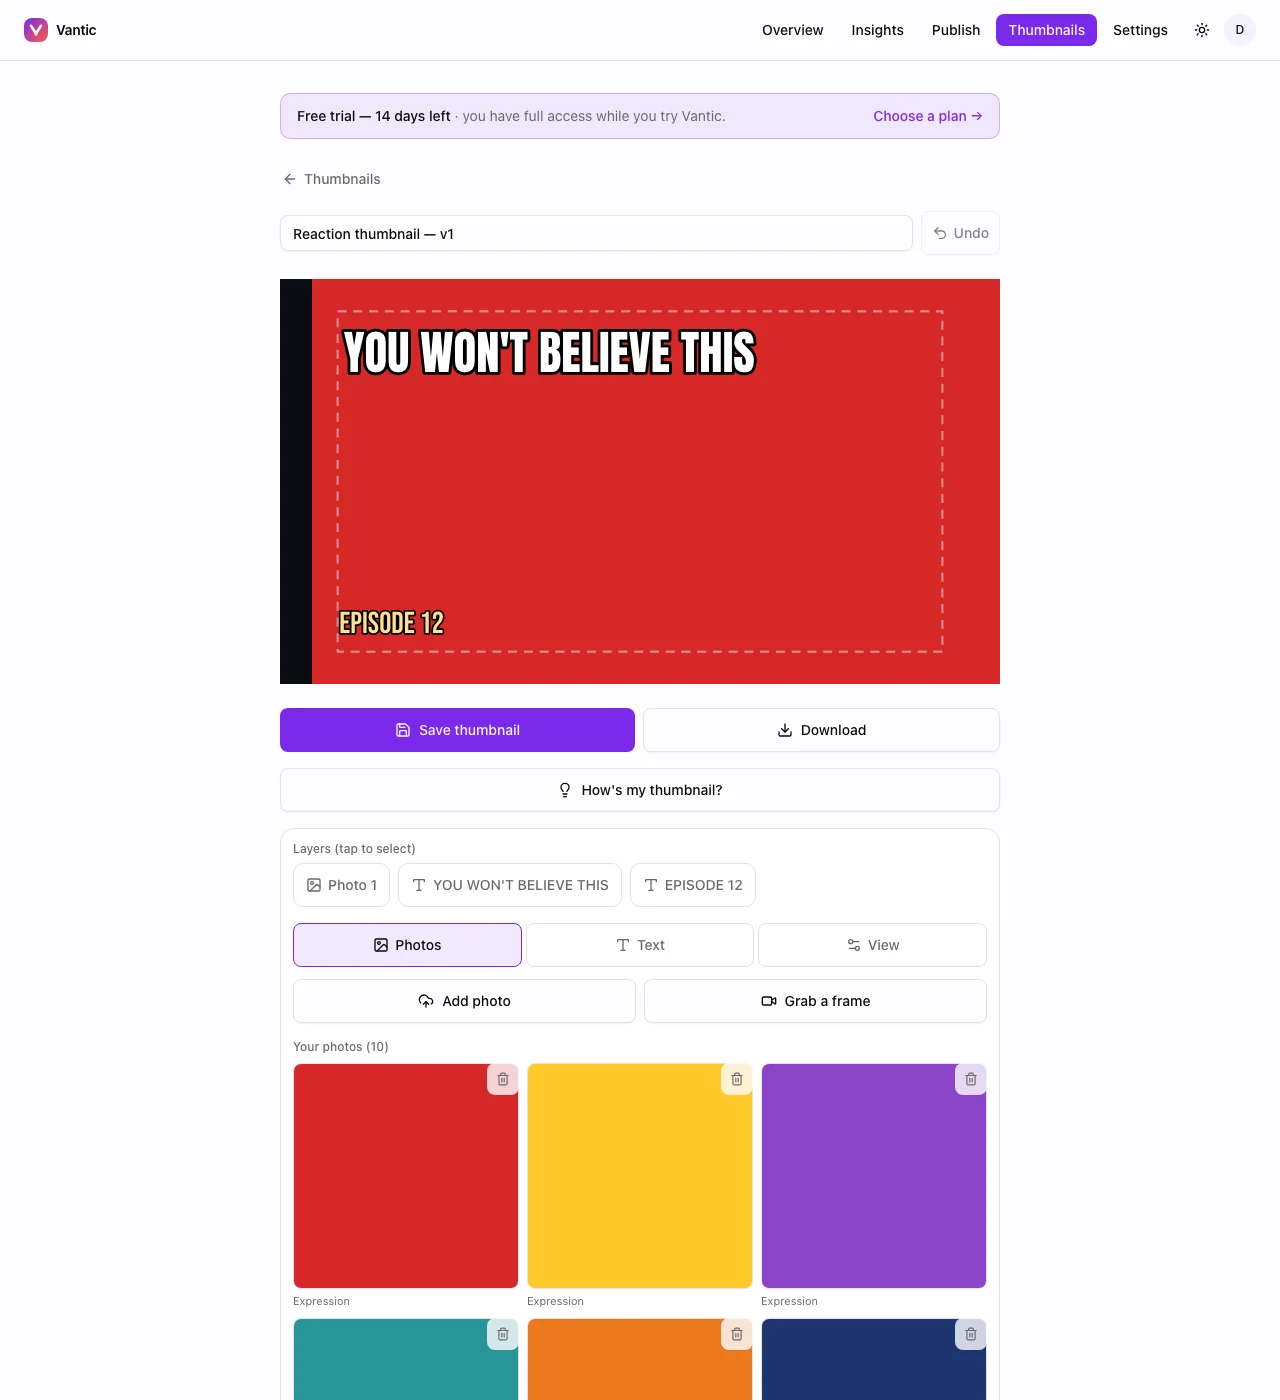
- 1. Name your design
- 2. Save the picture, or download it
- 3. Ask for an honest AI critique
- 4. Tap a layer to select it
- 5. Photos, Text and View tools
- 6. Add a photo or grab a frame from a video

- 1. The ten-minute photoshoot, step by step
- 2. Pick the expression first
- 3. Then choose those photos from your camera roll
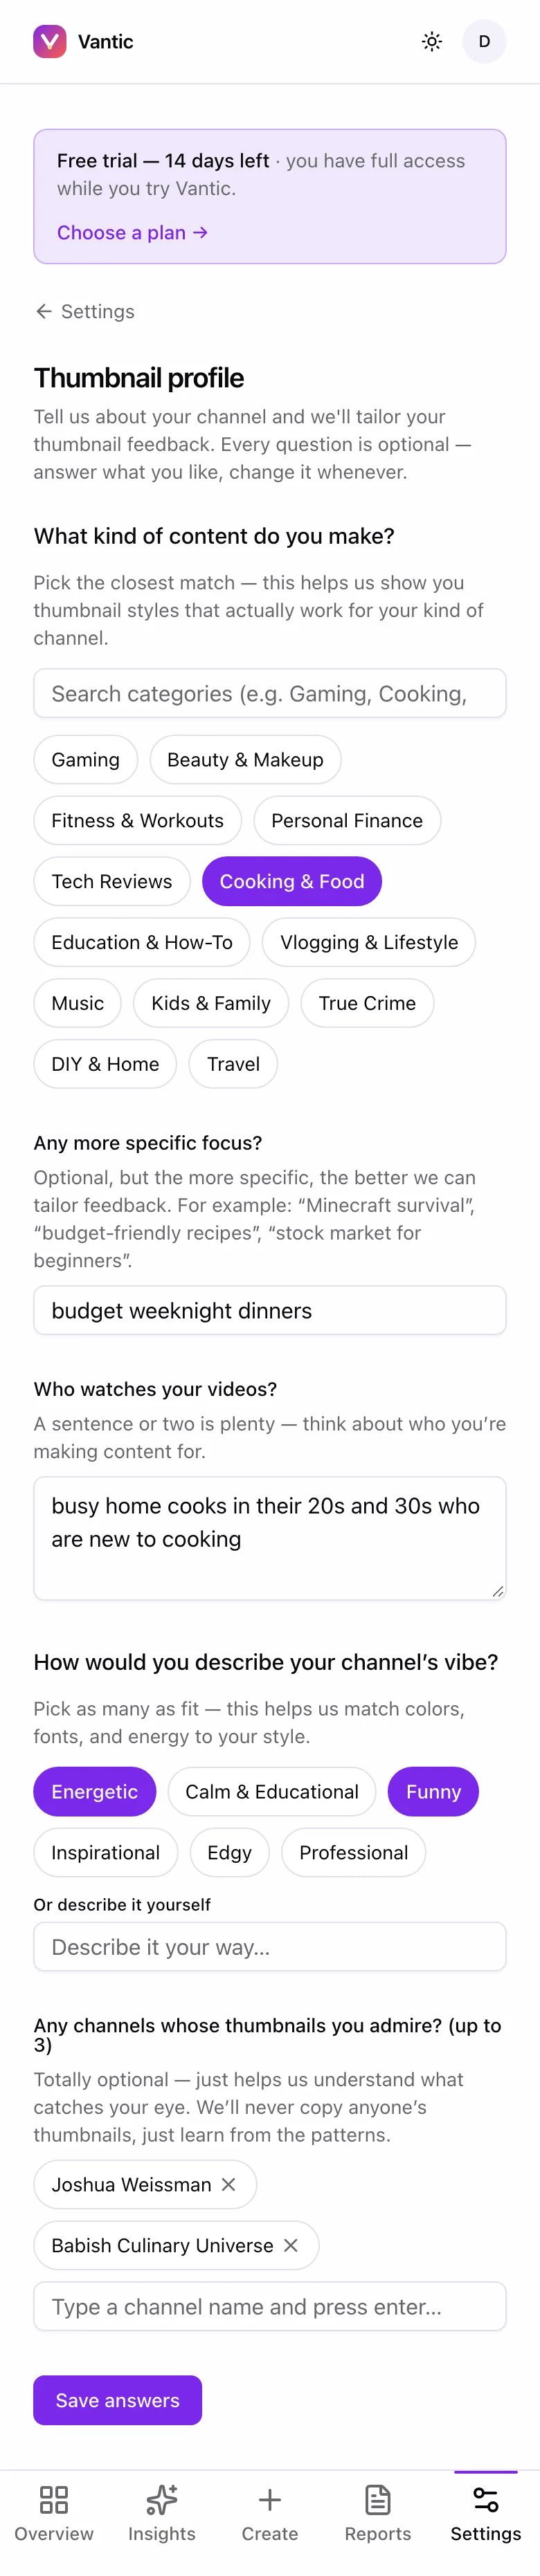
- 1. Pick the closest kind of channel
- 2. Tell it who you make videos for
Steps
Set up once: your channel and your photos
In Settings → Thumbnail profile, pick your content type, focus and who watches — the "How's my thumbnail?" feedback is tailored to it. Then open Photo library, add photos of yourself and label each one (Shock, Joy, Pointing, Victory and so on).
Design
Tap Start me off for a ready-made first draft, or New thumbnail for a blank canvas. Add photos or Grab a frame from a video, add text, pinch to resize.
Check it and save
Tap "How's my thumbnail?" for feedback, then Save thumbnail and Download.
Get the most out of it
- No good photos yet? Do a photoshoot walks you through 8 quick steps, and Read the photo guide explains what makes an expression read at small sizes.
- "How's my thumbnail?" is limited, so use it on designs you're nearly happy with.
Questions
What photos can I add to Thumbnail Studio?
JPEG, PNG or WebP, up to 10 MB each and up to 100 photos in your library. Each thumbnail can use up to 3 photos.
Step 11
Customize your metrics
Choose which numbers you see and in what order. One list sets it everywhere — the Overview, account pages and your email report.
Where: Settings → Dashboard (or Customize on the Overview)
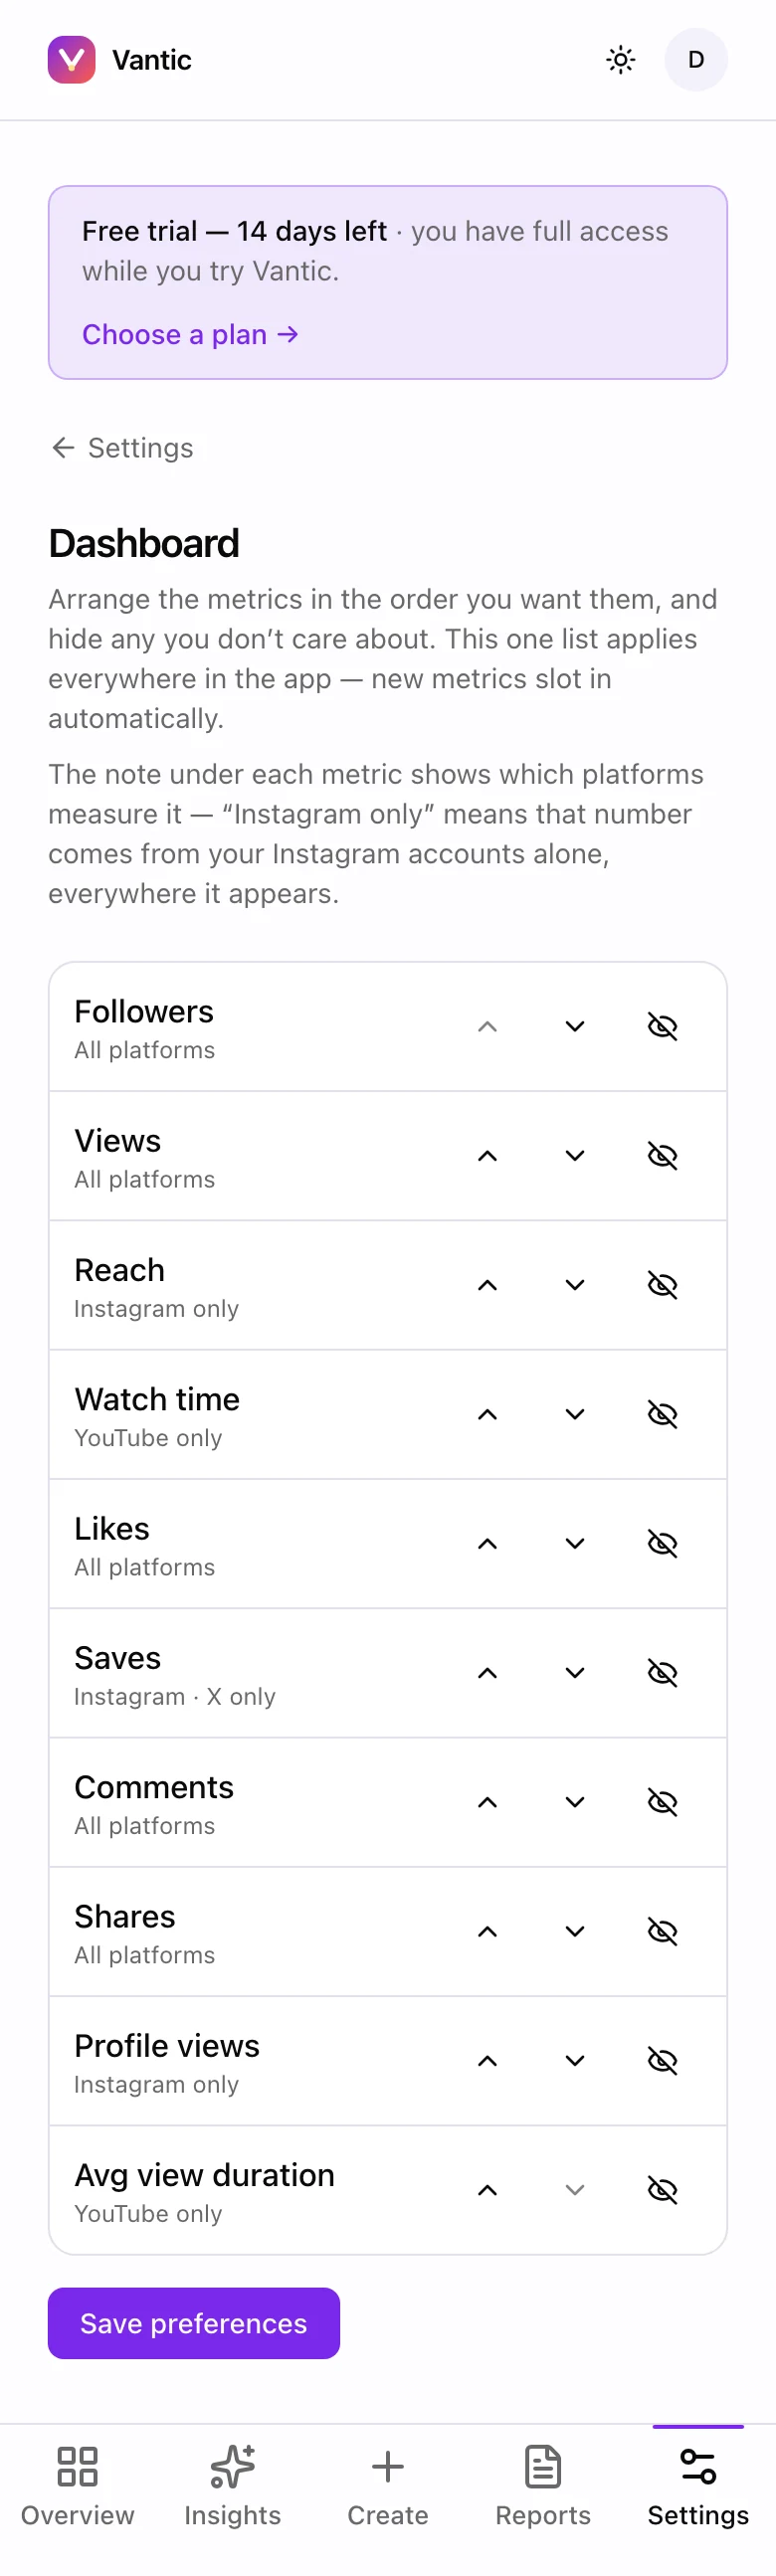
- 1. Move a metric up or down
- 2. Hide a metric you don't care about
- 3. Which platforms measure this one
Steps
Put your favourites first
Move the numbers you care about most to the top and hide the ones you don't need. It takes a minute and every screen and report follows.
Get the most out of it
- The note under each metric says which platforms measure it — "All platforms", "YouTube only" and so on — so you know why a number might be missing for an account.
Questions
How do I hide or reorder a metric?
Go to Settings → Dashboard. Use the up and down arrows to reorder, and tap Hide on any metric to hide it. You can bring it back whenever you like.
Does the order I choose apply to the email report too?
Yes. One list sets the order on the Overview, the account pages and the daily email report.
Step 12
Help & support
Quick answers when you need them, and a real person when you need one of those.
Where: Settings → Help & support
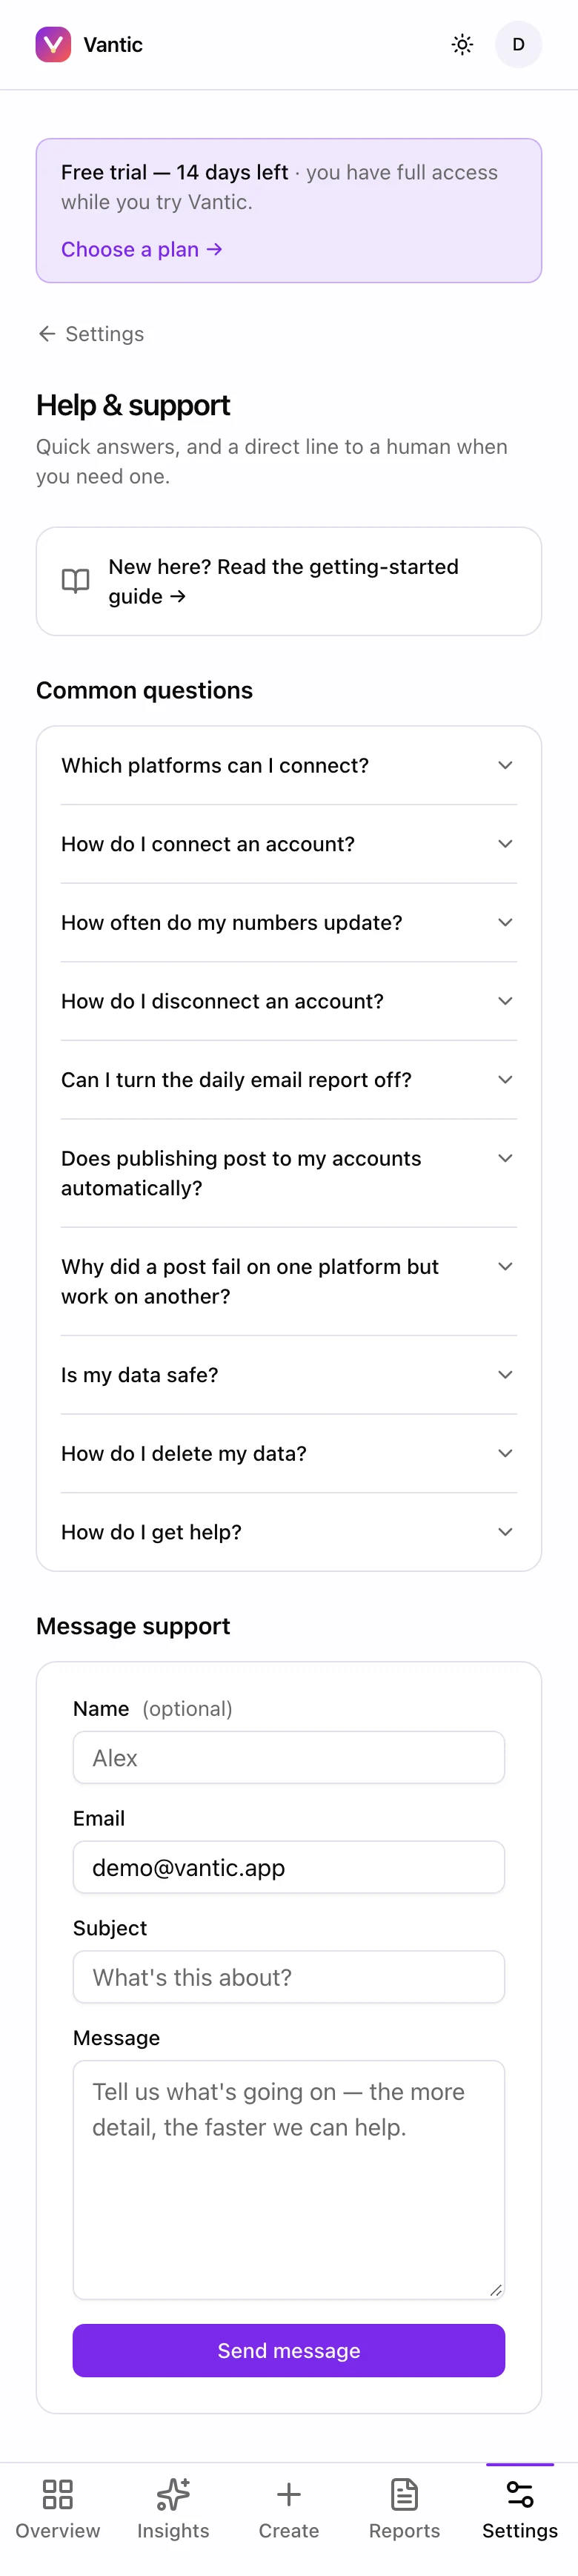
- 1. Quick answers
- 2. Message a human
Steps
Check Common questions or ask the assistant
Most answers are a tap away in the list. When the assistant is available, type your question and get an answer straight away.
Message support
Use the Message support form — a person replies within a business day. You can also email support@vantic.app.
Questions
How do I contact Vantic support?
Use the Message support form in Settings → Help & support, or email support@vantic.app. A person replies within a business day.
Does Vantic support two-factor authentication?
Yes. Go to Settings → Security, tap Enable two-factor and scan the code with an authenticator app. You'll also get one-time backup codes.
How do I change my password?
Go to Settings → Security and tap Change password.
Where do I see my plan and invoices?
Settings → Billing shows your trial or plan, and once you subscribe, your payment method and invoices.
How do I delete my account?
Go to Settings → Security, tap Delete account and type your email to confirm. Your account and its data are removed.
Step 13
Your first week checklist
Do these once and Vantic runs itself from then on.
Steps
Connect every account you post on
Settings → Connections.
Install it on your phone
So your numbers are one tap away.
Turn on push alerts
Settings → Notifications → "Push on this device".
Set your report time
Settings → Reports — pick a time you'll actually read it, then Send test now.
Make something
Publish or schedule your first post. If you have the Thumbnail Studio add-on, build your first thumbnail too.
Share your media kit
Switch it on and send the link to a brand you'd like to work with.
Try it on your own accounts
Every feature in this guide is included for 14 days, free. Questions first? Ask us.
Start your free trial